
My last Windows workstation was repurposed by Bluestreak around 2009. My current hobby workstation is a 2013 Mac Pro, still kicking just fine, which I wrote about in a previous post, "Justifying the new Mac Pro."
I love the Mac life, and my daily driver for official work continues to be a company-issued MacBook Pro, but recent projects have made me bend. Try building automation around Get-WinEvent on a Mac, for example. I also want to test things at scale, and I am constantly brushing up against Docker file size constraints and the inability to create things like AGs locally. My reluctance to go back to using VMs, coupled with the realities of being hundreds of miles from any real Windows server, and the answer is simple:
I need a local Windows machine.
Sure, I could repurpose the Mac Pro by using Boot Camp to boot directly into Windows. But like I said, this machine is still working great; I use it for all sorts of things, including blogging and Photoshop, and I'm not ready to give up on it yet. Also I want to run a server, and Boot Camp (and all its drivers) is much more compatible with consumer operating systems. I want a dedicated Windows server without disrupting my current setup. So the next question, obviously:
Build or Buy?
I am very much a proponent of buying something off the shelf that just works, hence the Macs. But I looked around and found nothing that interested me from the major PC players, and any configurable solution cost a lot to get up to a decent spec even remotely close to what I had in mind. I'll summarize my comparison shopping further down, but for now let's just say building was an easy choice.
I'm not a hardware guy, and I don't love being my only support avenue, but I am handy enough to get by. So, with some great guidance from Glenn Berry (including his $900 gaming PC guide), I set out to build my own machine, and here is what I came up with.
Amazon has relatively good prices, but they are out of stock and delivery dates are pushed way out. (Steak is a nickel a pound when you're out, right?) Newegg is competitive on most parts, and they have more stock, so one big order came from there. I'll still link to Amazon for SKUs they have, because their specs are generally more thorough, and they have more reviews and Q & A. If Newegg was able to get me the same part for similar or less money, I'll also link to that SKU. Please shop around for prices, availability, and delivery estimates, since all of those will change by the time you're reading this.
| Component | My Choice | Explanation | Price |
|---|---|---|---|
| Motherboard | MSI MAG B550M BAZOOKA | This recommendation came straight out of Glenn's post. It supports one Gen4 M.2 SSD, but I stuck with Gen3 for now; it will be easier to upsize later when Gen4 is more common. | $130 (Newegg) |
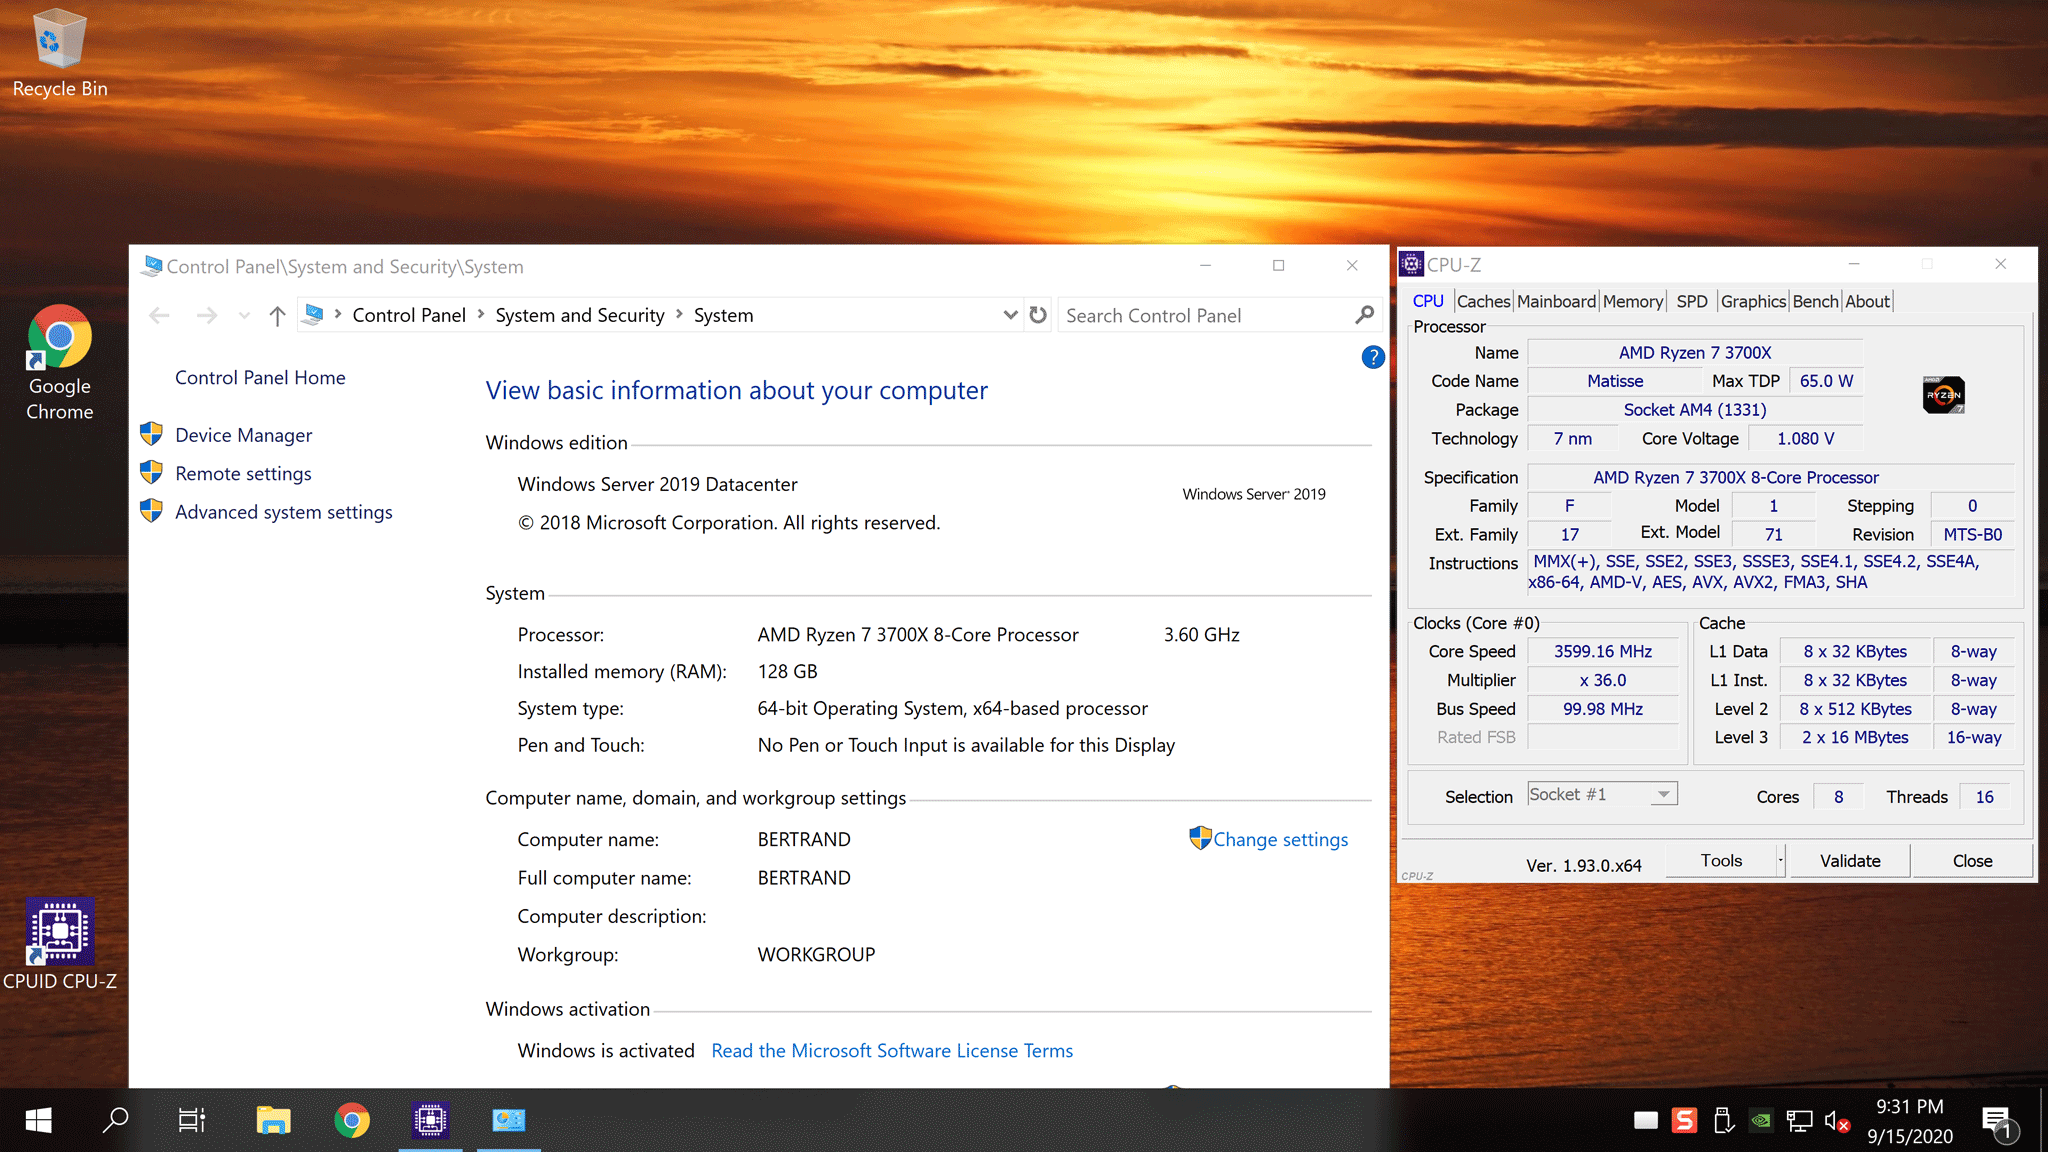
| CPU | AMD RYZEN 7 3700X | Eight cores / 16 threads at 3.6 GHz (up to 4.4 GHz). Glenn recommended the 6-core Ryzen 5 3500, but a few extra bucks for an even power of 2 seemed like a reasonable splurge; a good compromise at a step down from the 3800X ($50 more for an extra 300 MHz). | $300 (Newegg) |
| Memory | G.Skill RipJaws V Series 128GB | This is the single most expensive component (DDR4-3600), and the primary reason I'm building: A box built with 128GB is either super expensive or just doesn't exist, and I don't want a brand new workstation with the same amount of memory as the one I bought 7 years ago. | $450 (Newegg) |
| Storage | Samsung 970 EVO PLUS M.2 1TB | I have had very good results with Samsung drives and they're probably the only model I'll buy for some time. As mentioned above, this is a Gen3, but if I need to expand later I could easily replace it with a Gen[>3]. | $180 (Newegg) |
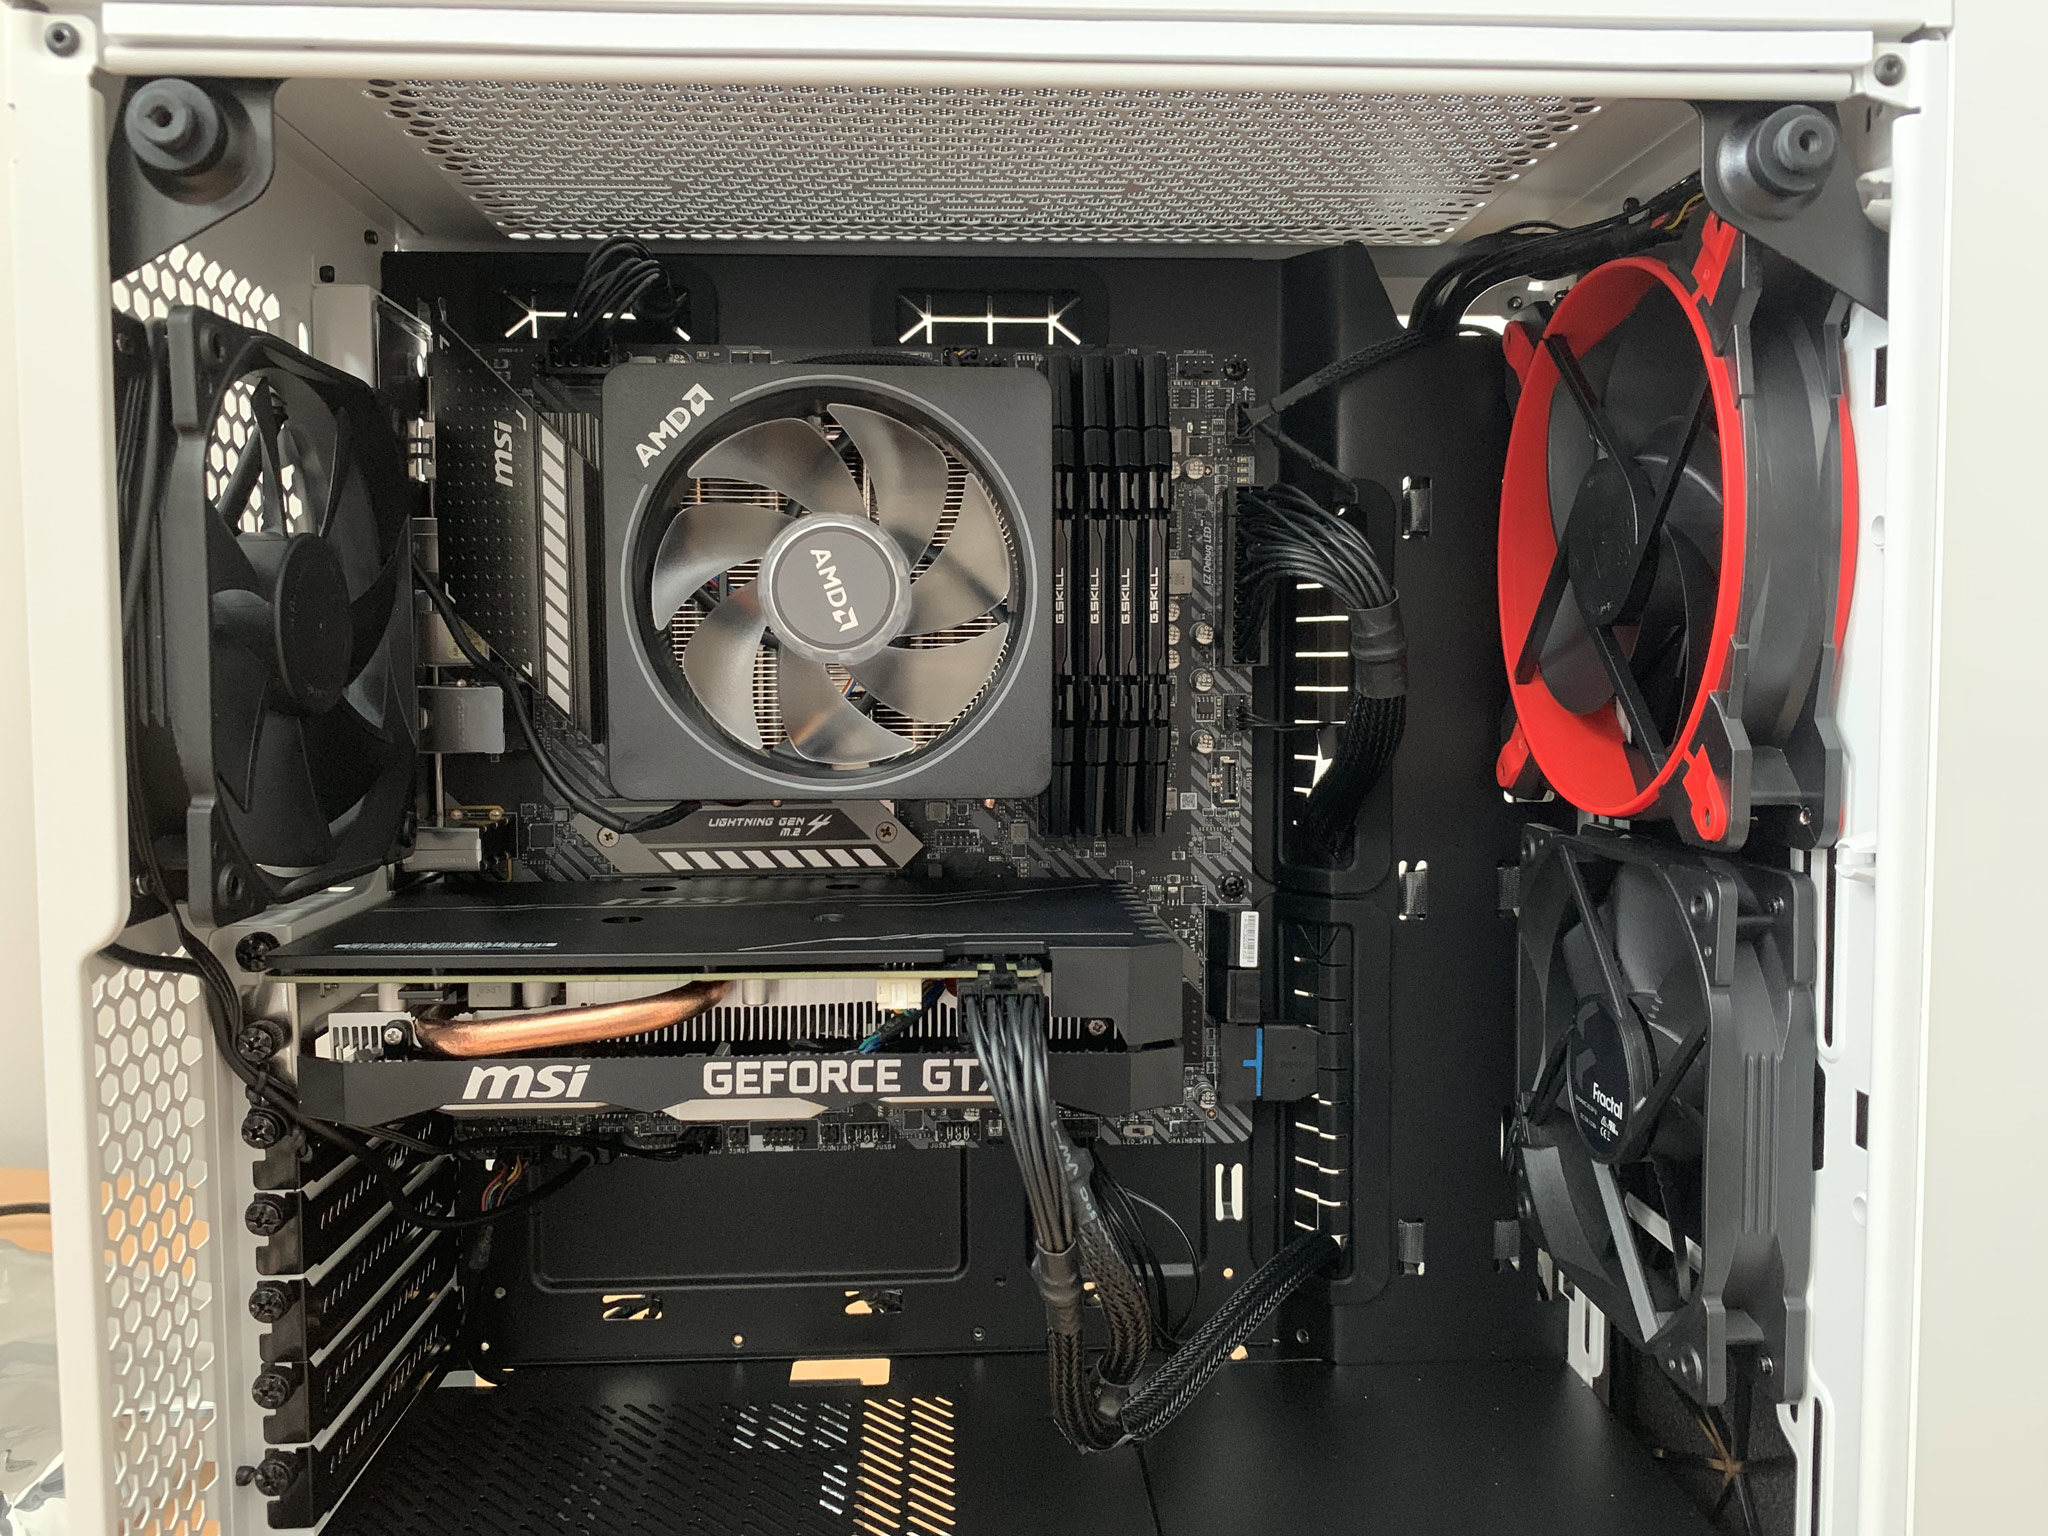
| Graphics | GeForce GTX 1660 Super 6GB | I'm not a gamer, but I do some graphics work, so I'm going with Glenn's suggestion that the super is worth a few extra bucks over the regular 1660. | $250 (Newegg) |
| Case | Fractal Design Meshify C | I originally looked at the be quiet! Silent Base 601 for the coolness factor and size, but it was impractical for two reasons: Glenn said the thermal performance was not great, and he reminded me that smaller cases can make builds more tedious. I was originally optimizing for smaller size because I was planning to mount the case on the back of my monitor, but it will hide behind it nicely even without mounting, so this isn't a priority. | $90 (Newegg) |
| Power Supply | EVGA 500 GD 80+ | Like the motherboard, I have faith in Glenn's recommendation here. | $70 |
| KVM | CKLau 2-port | I just need a simple switch that handles DisplayPort (rather than HDMI or older), because I am not using both workstations at the same time and don't think I need to buy yet another monitor. This is not the one you want. Seriously, don't buy this one; it's garbage. The mouse and keyboard was way too laggy, and the DisplayPort died today. Looking at maybe this one instead. | $60 |
| Keyboard | Macally Ultra Slim Wired | I have tried many wireless keyboard and, between keeping a charge and handling interference, I'm going back to wired. It is unlikely this will be my final keyboard; I've been using the Logitech K780 for a while now, and I'm very sensitive to differences in feel, so it will probably take some trial and error to land on "perfect enough." | $40 |
| Trackpad | Brydge W-Touch | I won't use a mouse again. I bought this in case I couldn't get my Apple Magic Trackpad 2 to work with Windows, but I'm returning it because I got that to work with the $6/year Magic Trackpad Utilities. | $100 |
| Switch | TP-Link 5 Port TL-SG105 | I need a simple unmanaged switch over here so I don't have to run and secure a second ethernet cable. I have cables; I'm just that lazy. | $18 |
| UPS | APC BE600M1 | I don't have a UPS on this side of the office, and since I don't trust Windows to save state when the power goes out... this buys me a little time. | $63 |
| Extra fan | ARCTIC BioniX P140 | While this wasn't strictly necessary, I wanted a little extra cooling from the front of the case, just in case. Get it? Just in case? I'll see myself out. | $16 |
| Grand Total: | $1,767 | ||
| Grand Total without accessories I would need with any purchase: | $1,470 | ||
While I wait for shipment, I need to spend some time:
Preparing monitor / KVM
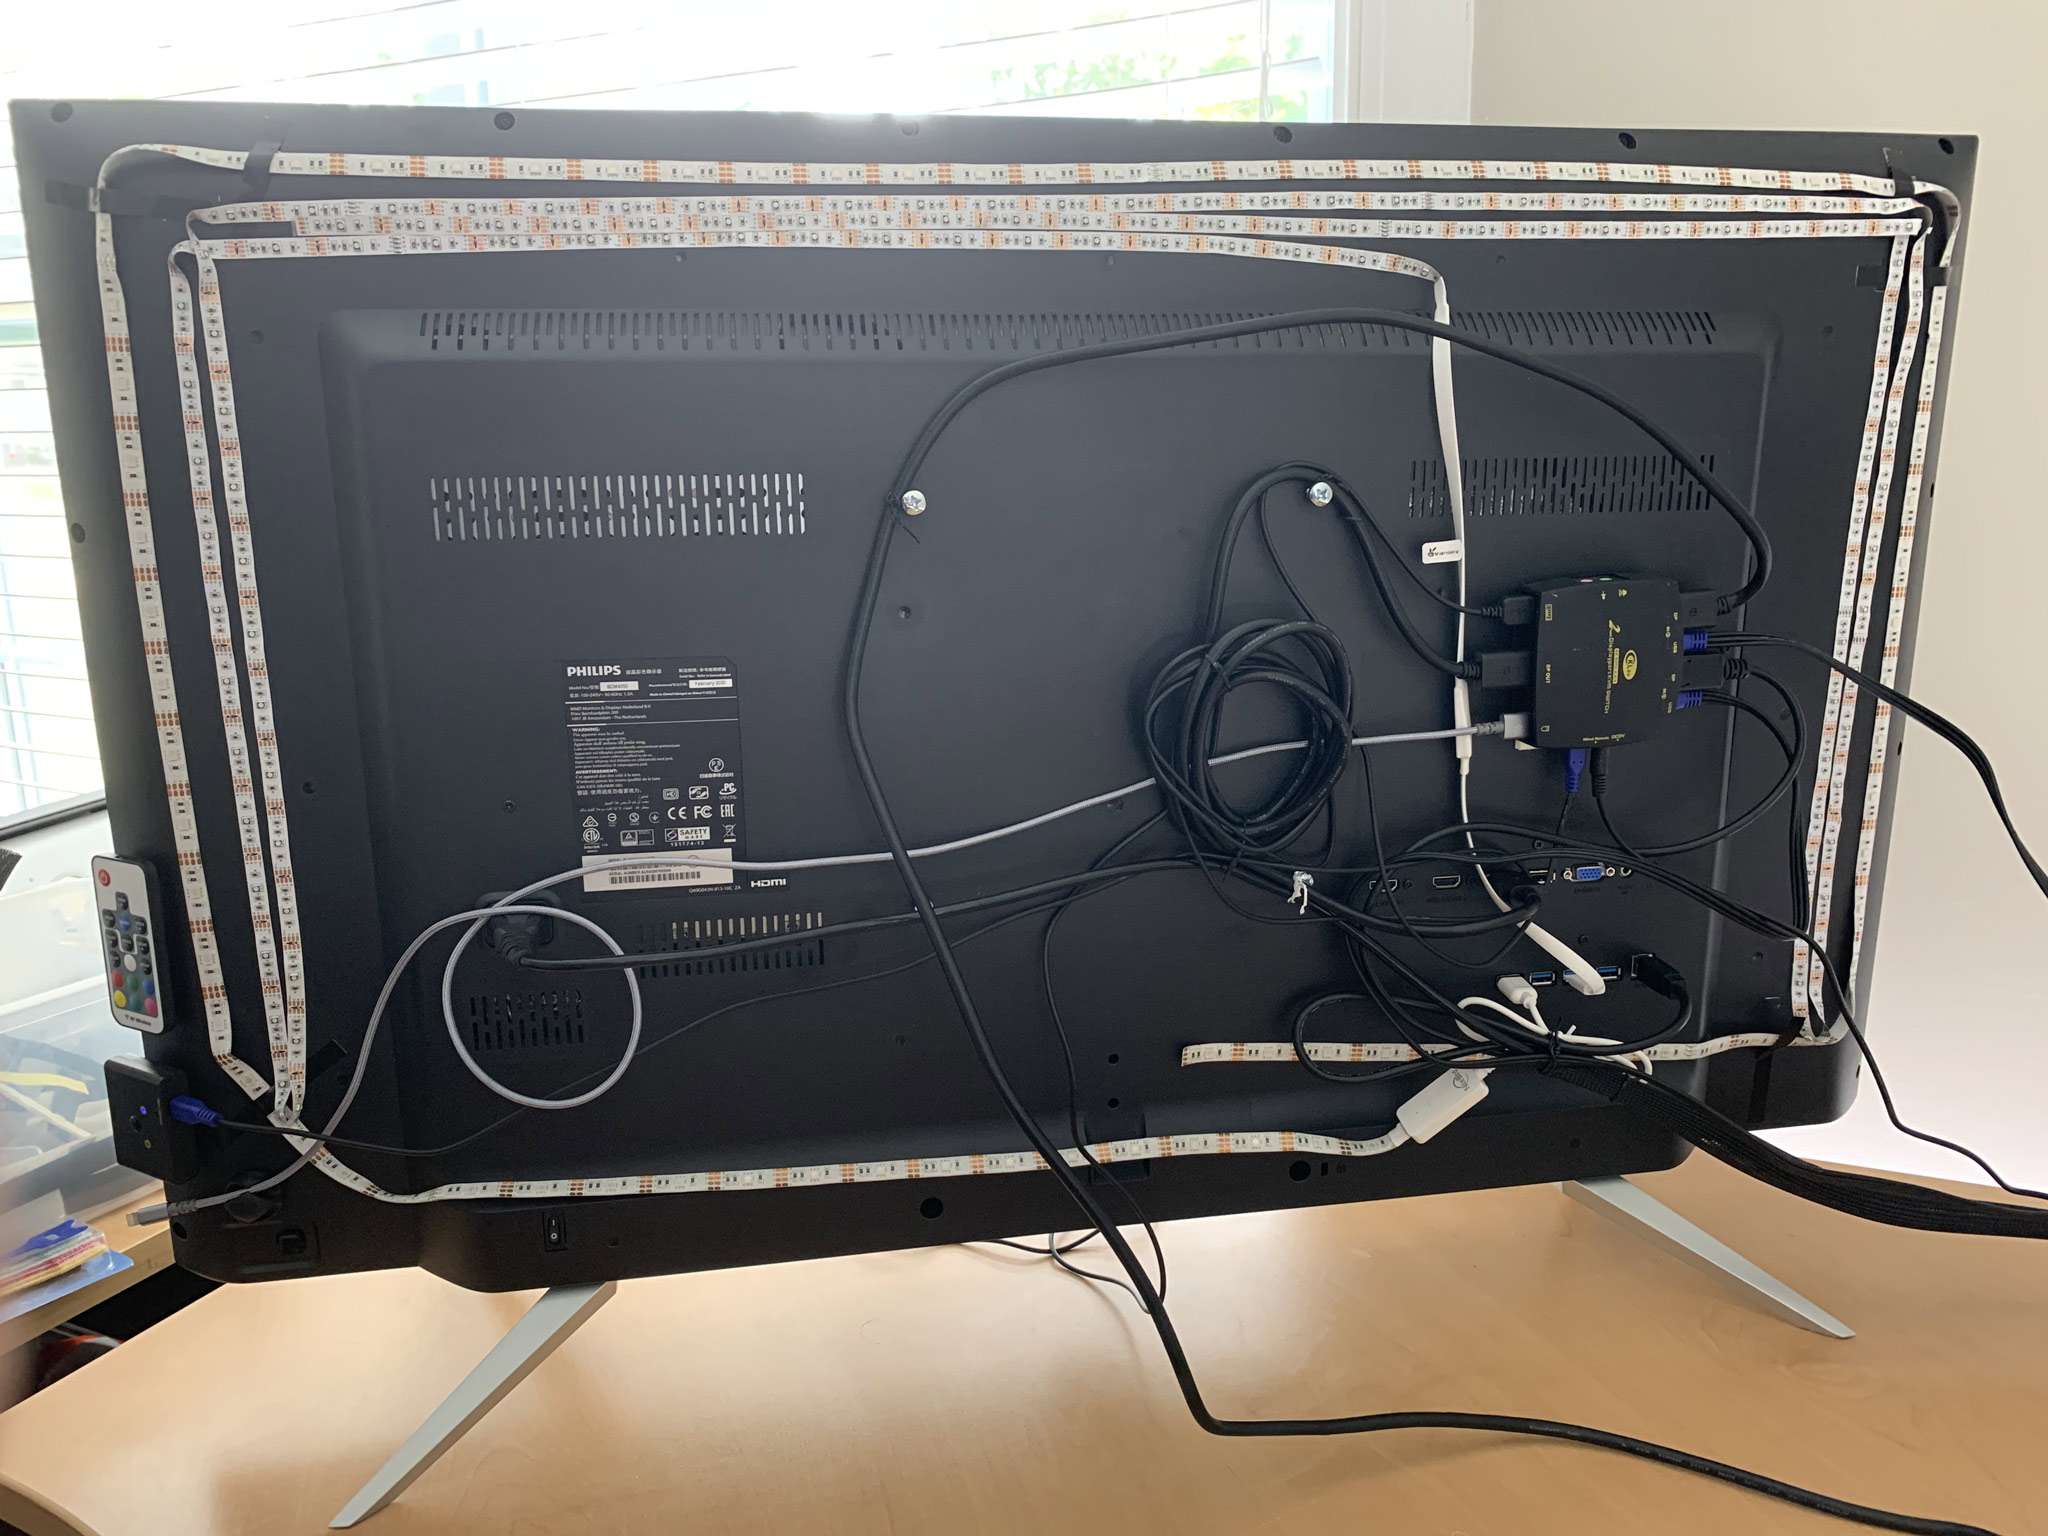
Anyone who knows me (or read my previous series) is well aware that I am very fussy about cables and lights showing. The back of my monitor has a bunch of LED lights set up in a hodge-podge way because I'm still trying to find good white LEDs that are strong enough for backlighting. I have some on my primary monitors, but Vansky discontinued that model and I've been trying ever since to match the color (it's a gorgeous warm white without any blue tint).
Anyway, adding a KVM to the mix makes cable management a lot more complicated, since now – instead of one DisplayPort, USB, and keyboard/trackpad cables – I need to triple that. Oh, and the KVM has a remote that is also wired. So I turn the monitor around and start figuring out how I'm going to make all of this work. Having gone through a lot of cable mounting experiments in the past, I knew that I needed to focus on minimal downward resistance.
I mounted the KVM on the back of the monitor sideways, in a way that wouldn't intrude on ports I may use later, using simple 3M command strips (velcro, not the two-sided sticky ones). The DisplayPort cable, still largely in its original coil, is very rigid. I plug that into the KVM and the monitor so that it just stays in place (again, minimizing downward pull). I cheat a bit and use four VESA mounting screws just to help tie off a few wires and reduce the load. Then I add the other peripherals – keyboard, mouse, monitor, and USB in from the existing computer:
 It took a few tries, but making that somewhat tidy is worth it.
I mount the remotes for the KVM and LEDs on the right (your left) edge of the monitor, again with 3M strips. This makes the KVM easy to reach, and the single button is huge, so just relying on feel is enough. I then add a little self-adhesive clip (a single from this set) to the bottom corner of the back of the monitor to hold the Lightning cable from my trackpad. The keyboard has a fixed wire, but I don't technically need to have the trackpad plugged in all the time; this is a cheap and effective way to tuck it out of sight.
And again, the key is to wrap and tie things together in a way that provides the least resistance, and minimizes the risk of pulling free given any sort of inadvertent tug. This makes for some trial and error, but it's so worth it to not have to handle your gear with kid gloves, or beg your kids not to yank on a keyboard — which, by the way, has zero influence on their likelihood to do so.
I wish the back could be prettier, but it is never going to look like a professional data center build back there. From the front, it looks pretty good so far. It's not zero wires, and I still have to hide a ginormous computer case, but it's pretty tidy IMHO:
 I just won't be showing under the desk anytime soon.
I take a Saturday lunch break to focus on:
Building the guts
I'm waiting on the power supply and the case, but most of the components are here, and I can start assembling. I'll throw on the CPU, the boot drive, and the memory:
 This all came in one box. It was like Christmas.
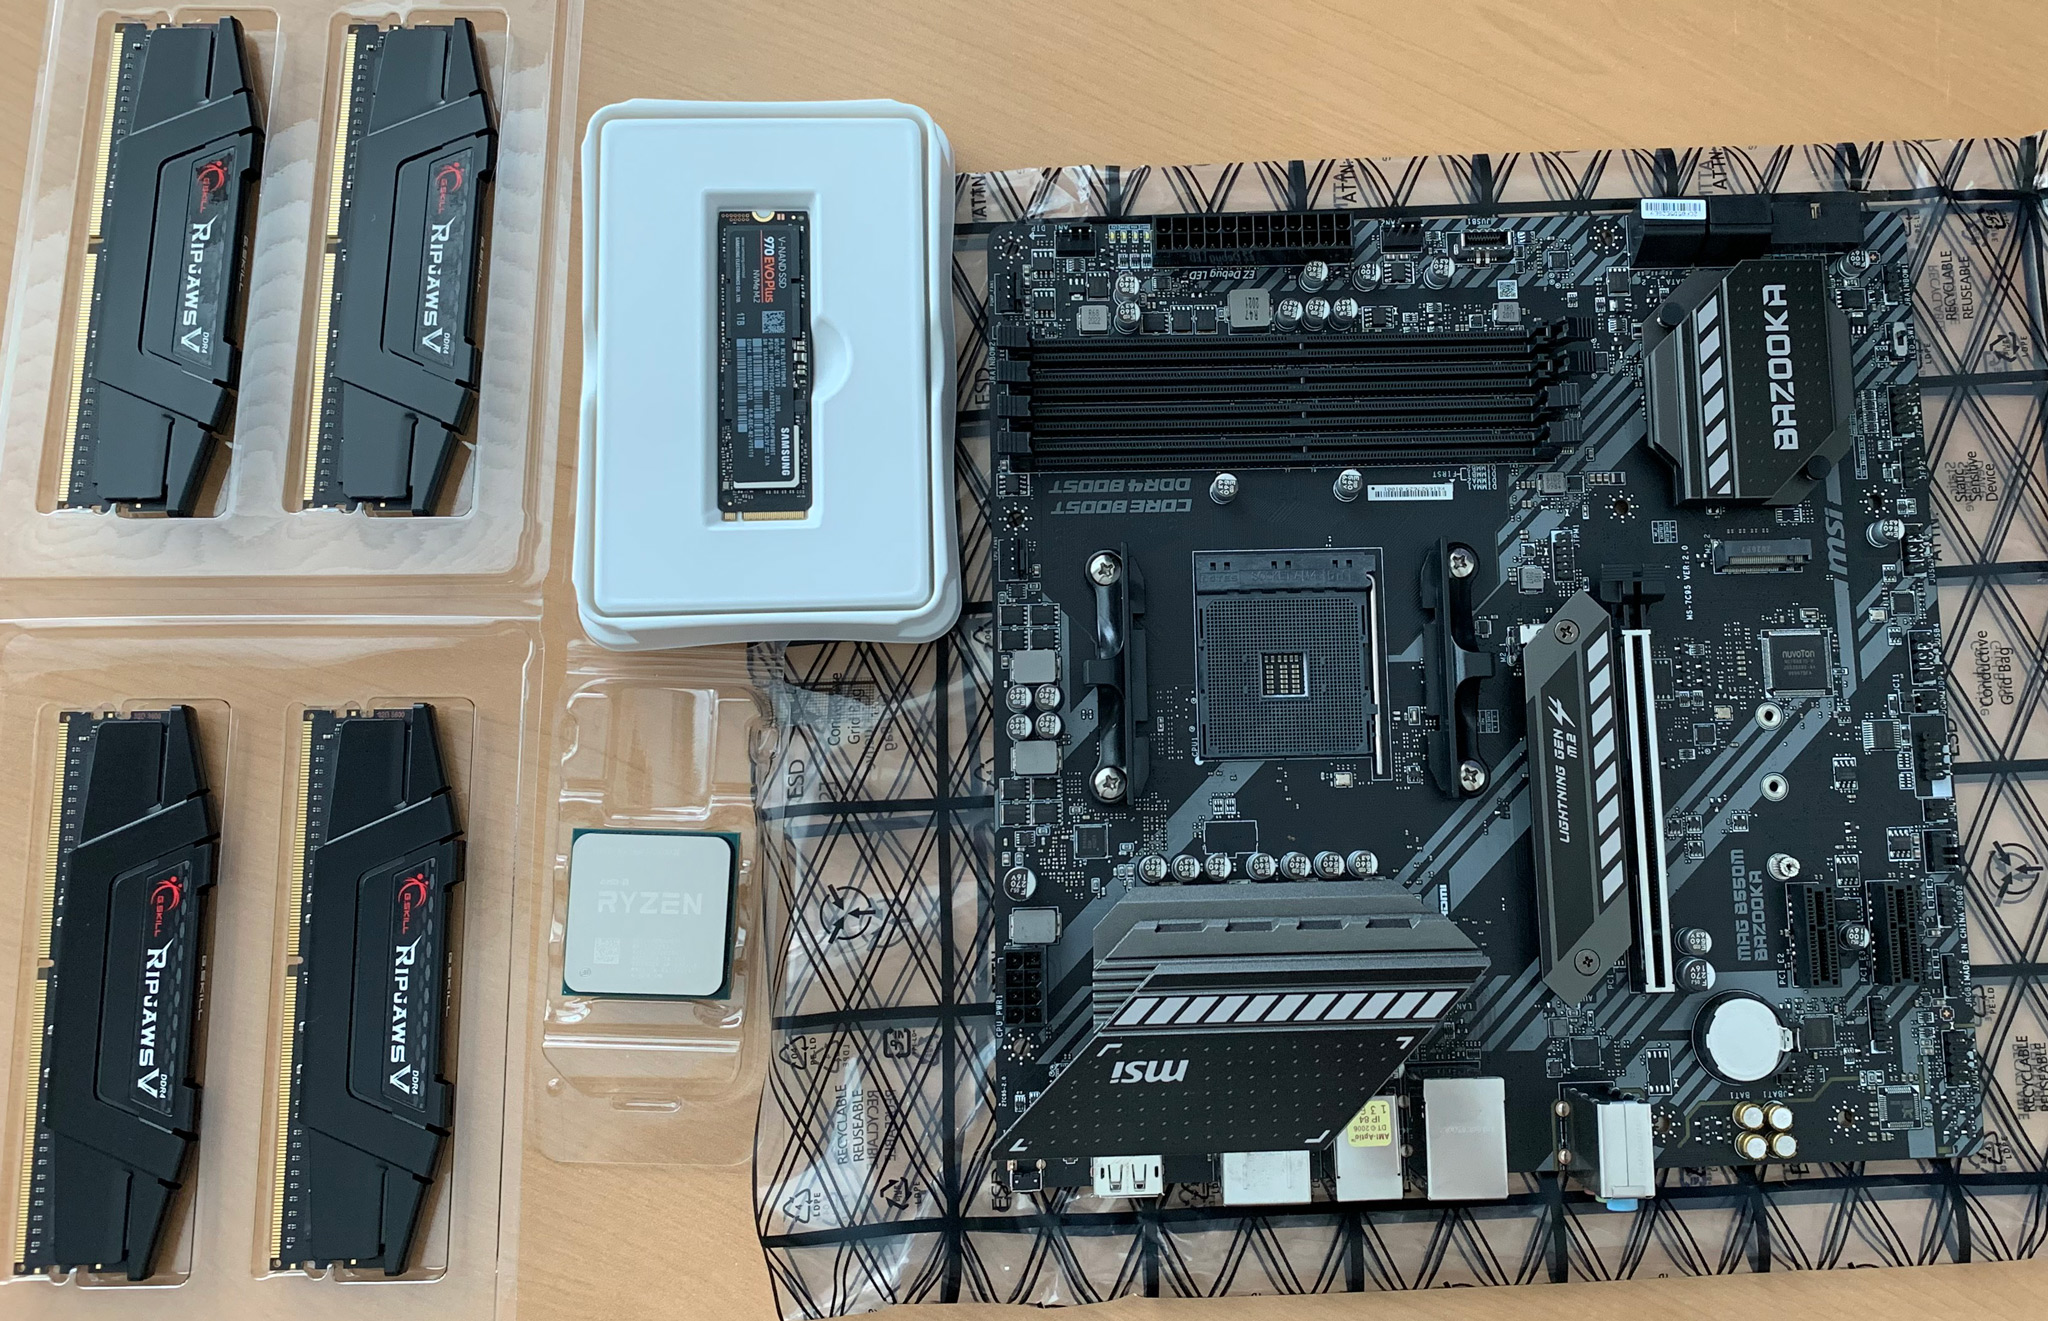 Ready to assemble
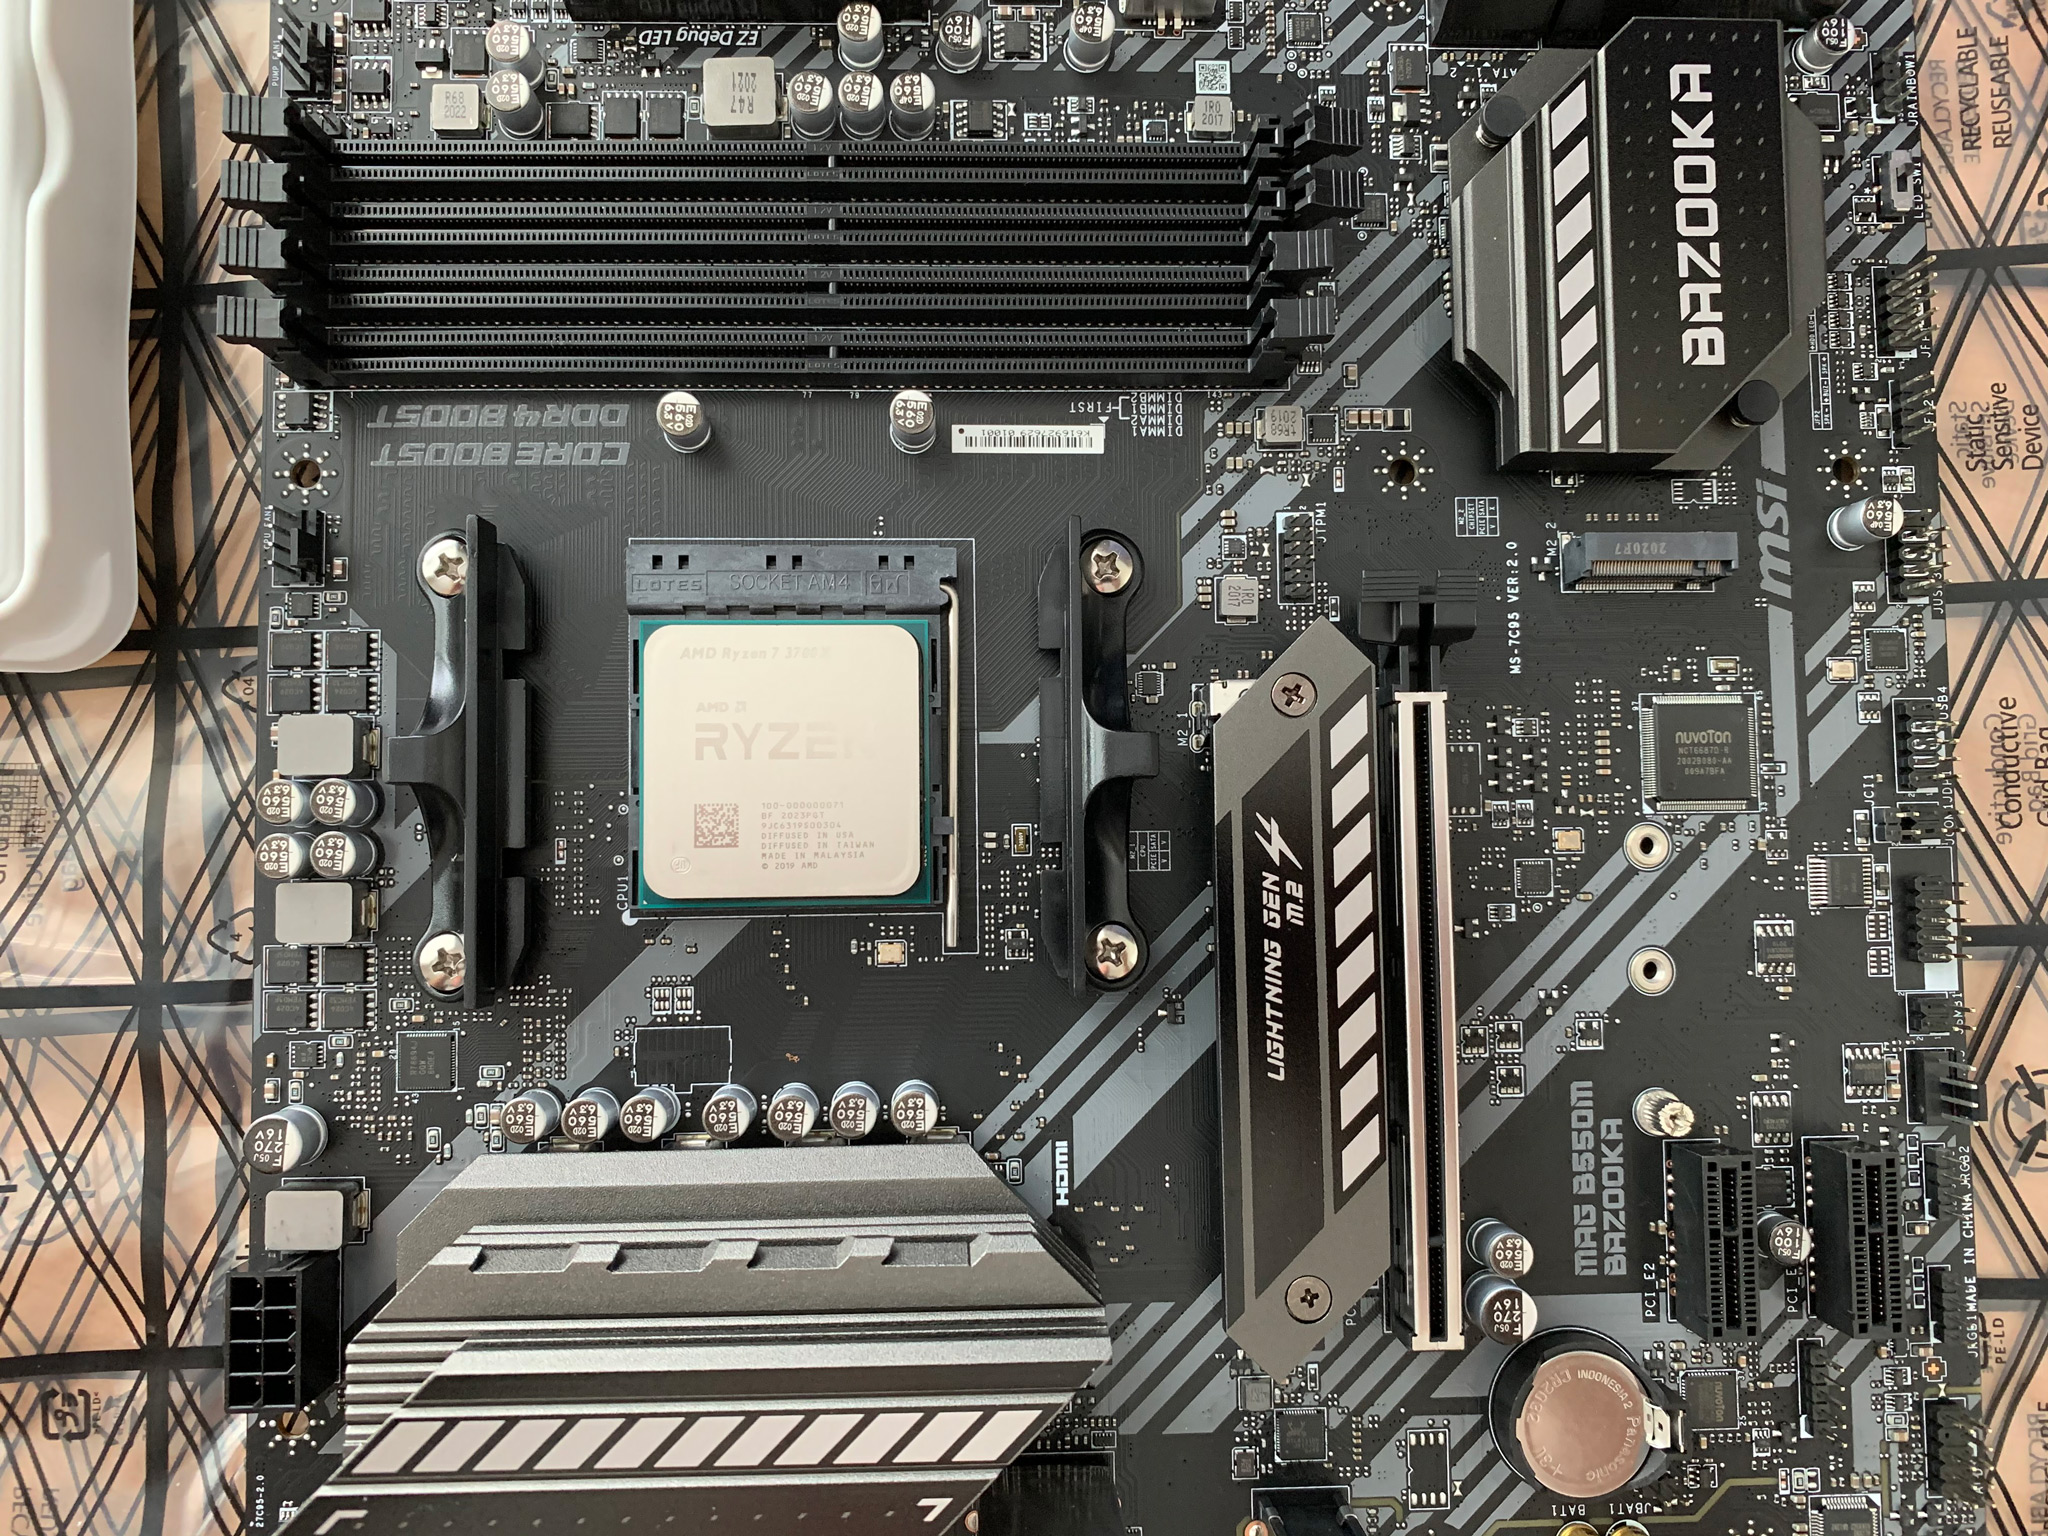 Putting in the CPU
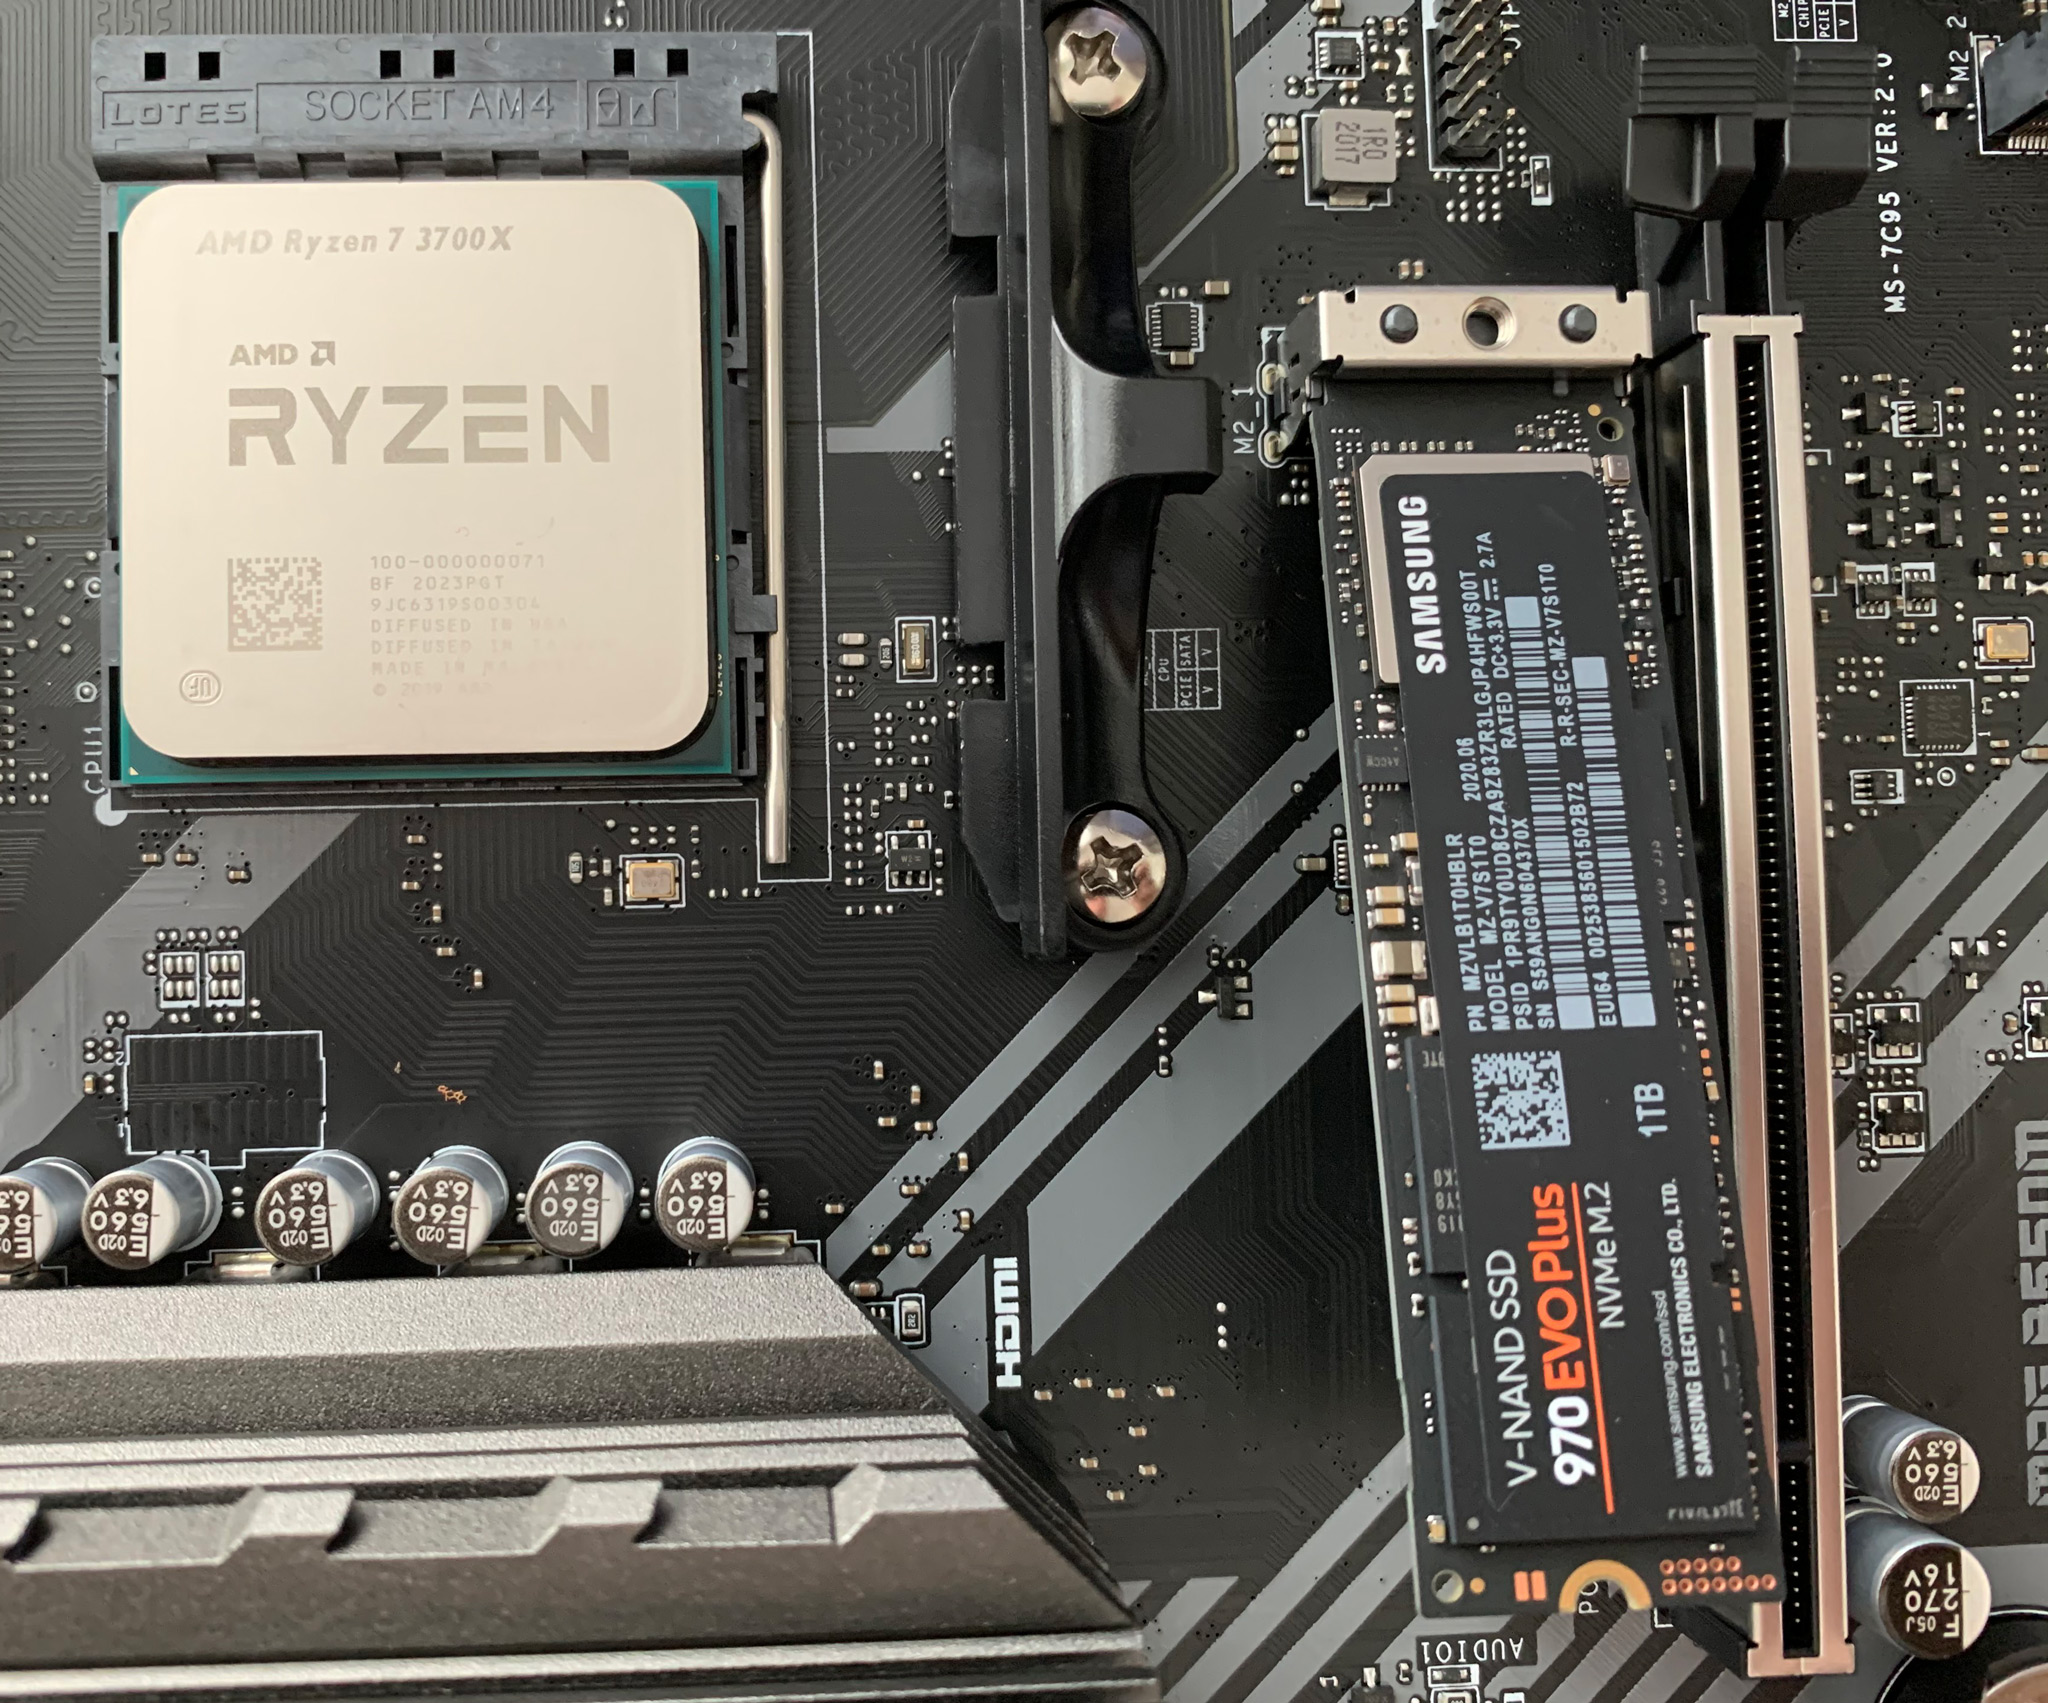 Getting the boot drive under its heat sink
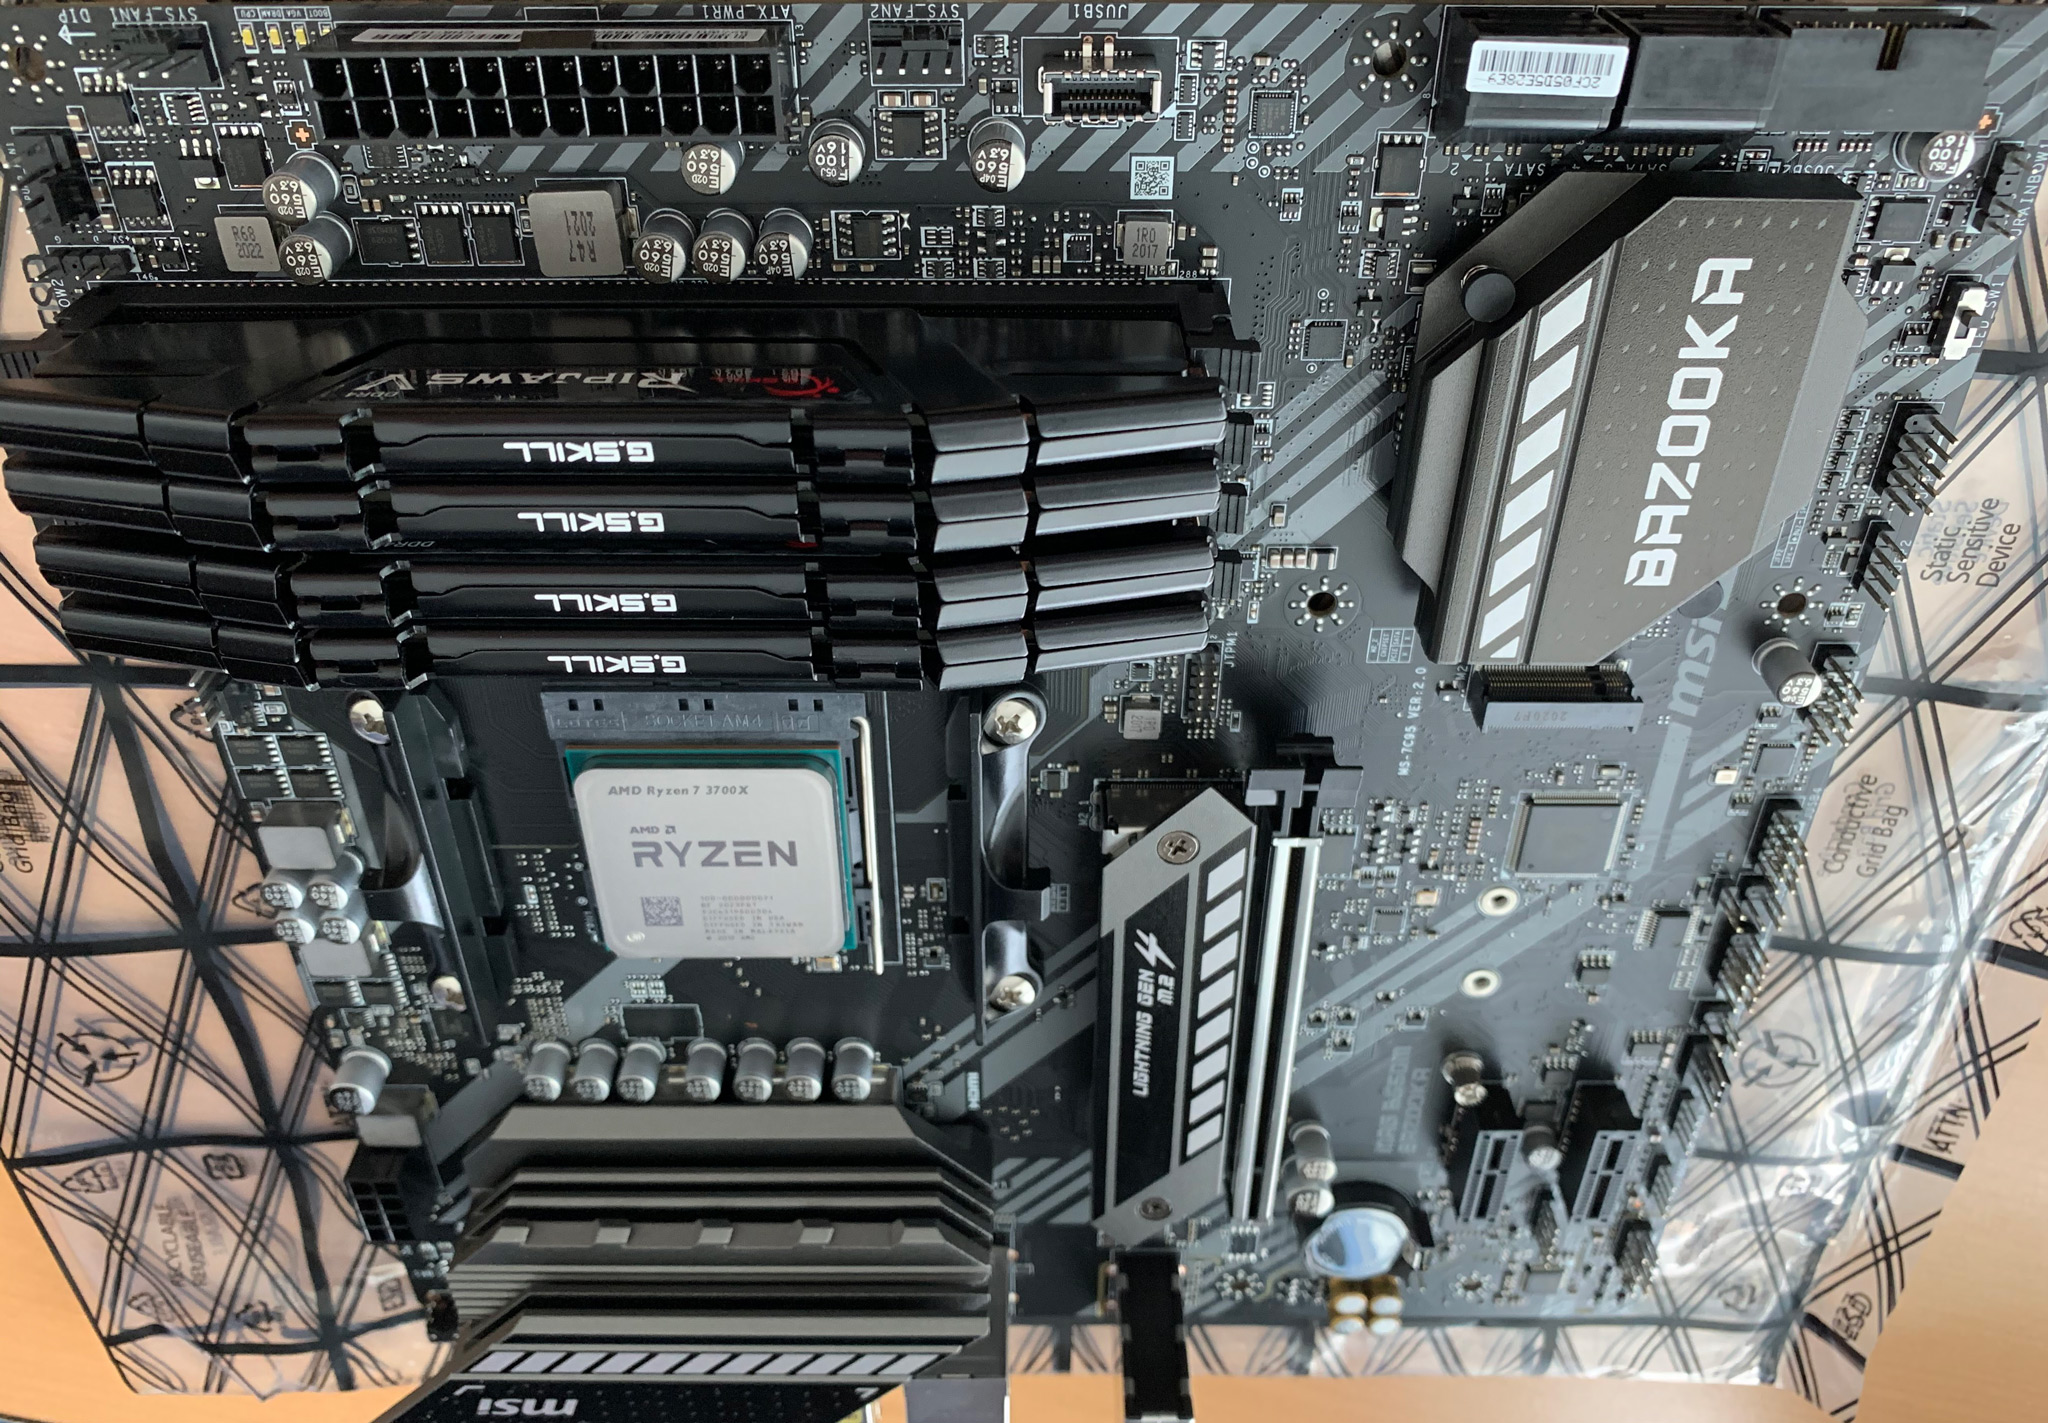 Finally, the memory
The cooler and graphics card will have to wait until the case arrives, so I slide the motherboard back into the anti-static bag. In the meantime, I can start:
Creating a bootable USB stick
As part of prep work, and as I wait impatiently for the remainder of the parcels to arrive, I need a way to install Windows. Luckily I have plenty of capable USB sticks lying around. If you're playing along at home, you can follow the official instructions for creating a bootable USB drive.
That guide is written with Windows 10 in mind, but should be roughly the same if you are targeting Windows Server. However, it assumes you are already running Windows. I don't have a Windows machine because chicken and egg, but I found this great guide from Alex Lubbock which explains the minor differences if you need to do the same from macOS.
The hurdle you may encounter is that install.wim is over 4GB in Windows 10, so it can cause issues during the copy. The solution, demonstrated in both articles, is to split that file into two pieces. For the latest Windows Server version (2004 – what a horrible name), this wasn't necessary, but I ended up going back to Windows Server 2019 because the semi-annual releases don't include the desktop experience.
The case arrives
The case was shipped from Canada and hit a predictable delay, but only by a couple of days. With a case and power supply, I can now complete assembly. Before you start screwing anything together, make sure you have the right tools; don't just grab a screwdriver from the garage. I have a laptop repair kit similar to this one; magnetic bits are key because being careful what you rub them against is easier than using big fingers to recover every screw you will almost certainly drop into the case.
I add the CPU cooler (which has thermal paste already applied) and screw the motherboard into the case. Then I mount the power supply and the case fans, this took me two tries because I mounted both in the wrong direction for air flow. You want the power supply's fan facing away from the motherboard so it pulls air into the case. And you want the fans all facing the same direction, so they're not fighting each other for air flow (if you are putting fans on the top or bottom and the front or back, ask Glenn).
Aside from a few initial setbacks, assembly is the easy part. Getting it to look tidy is actually more work, even with this case, which has some great cable management features. Here is my first stab:

It's Alive!
Now, let's plug it in, and see if it boots. The RGB certainly works:

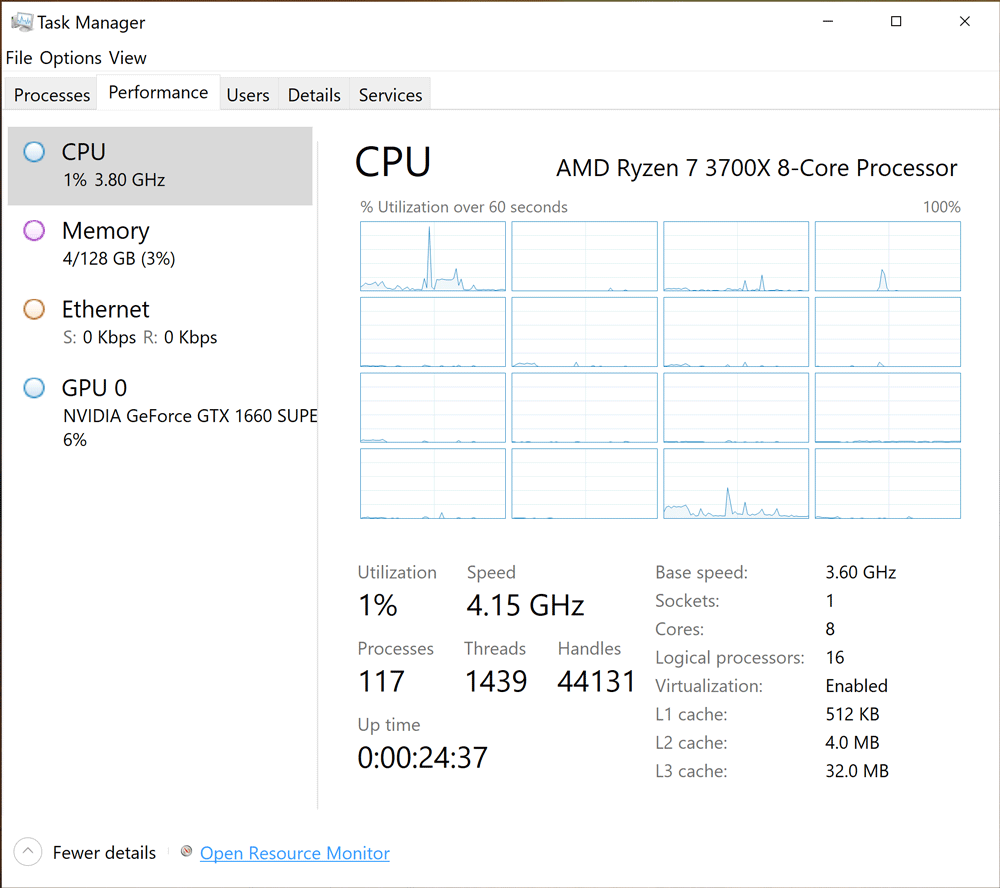
I boot up, install Windows Server 2019, flash the BIOS, and update the chipset and video drivers. I still have some tweaking to do in the BIOS (XMP / overclocking), but this is shaping up to be a pretty capable little workhorse:
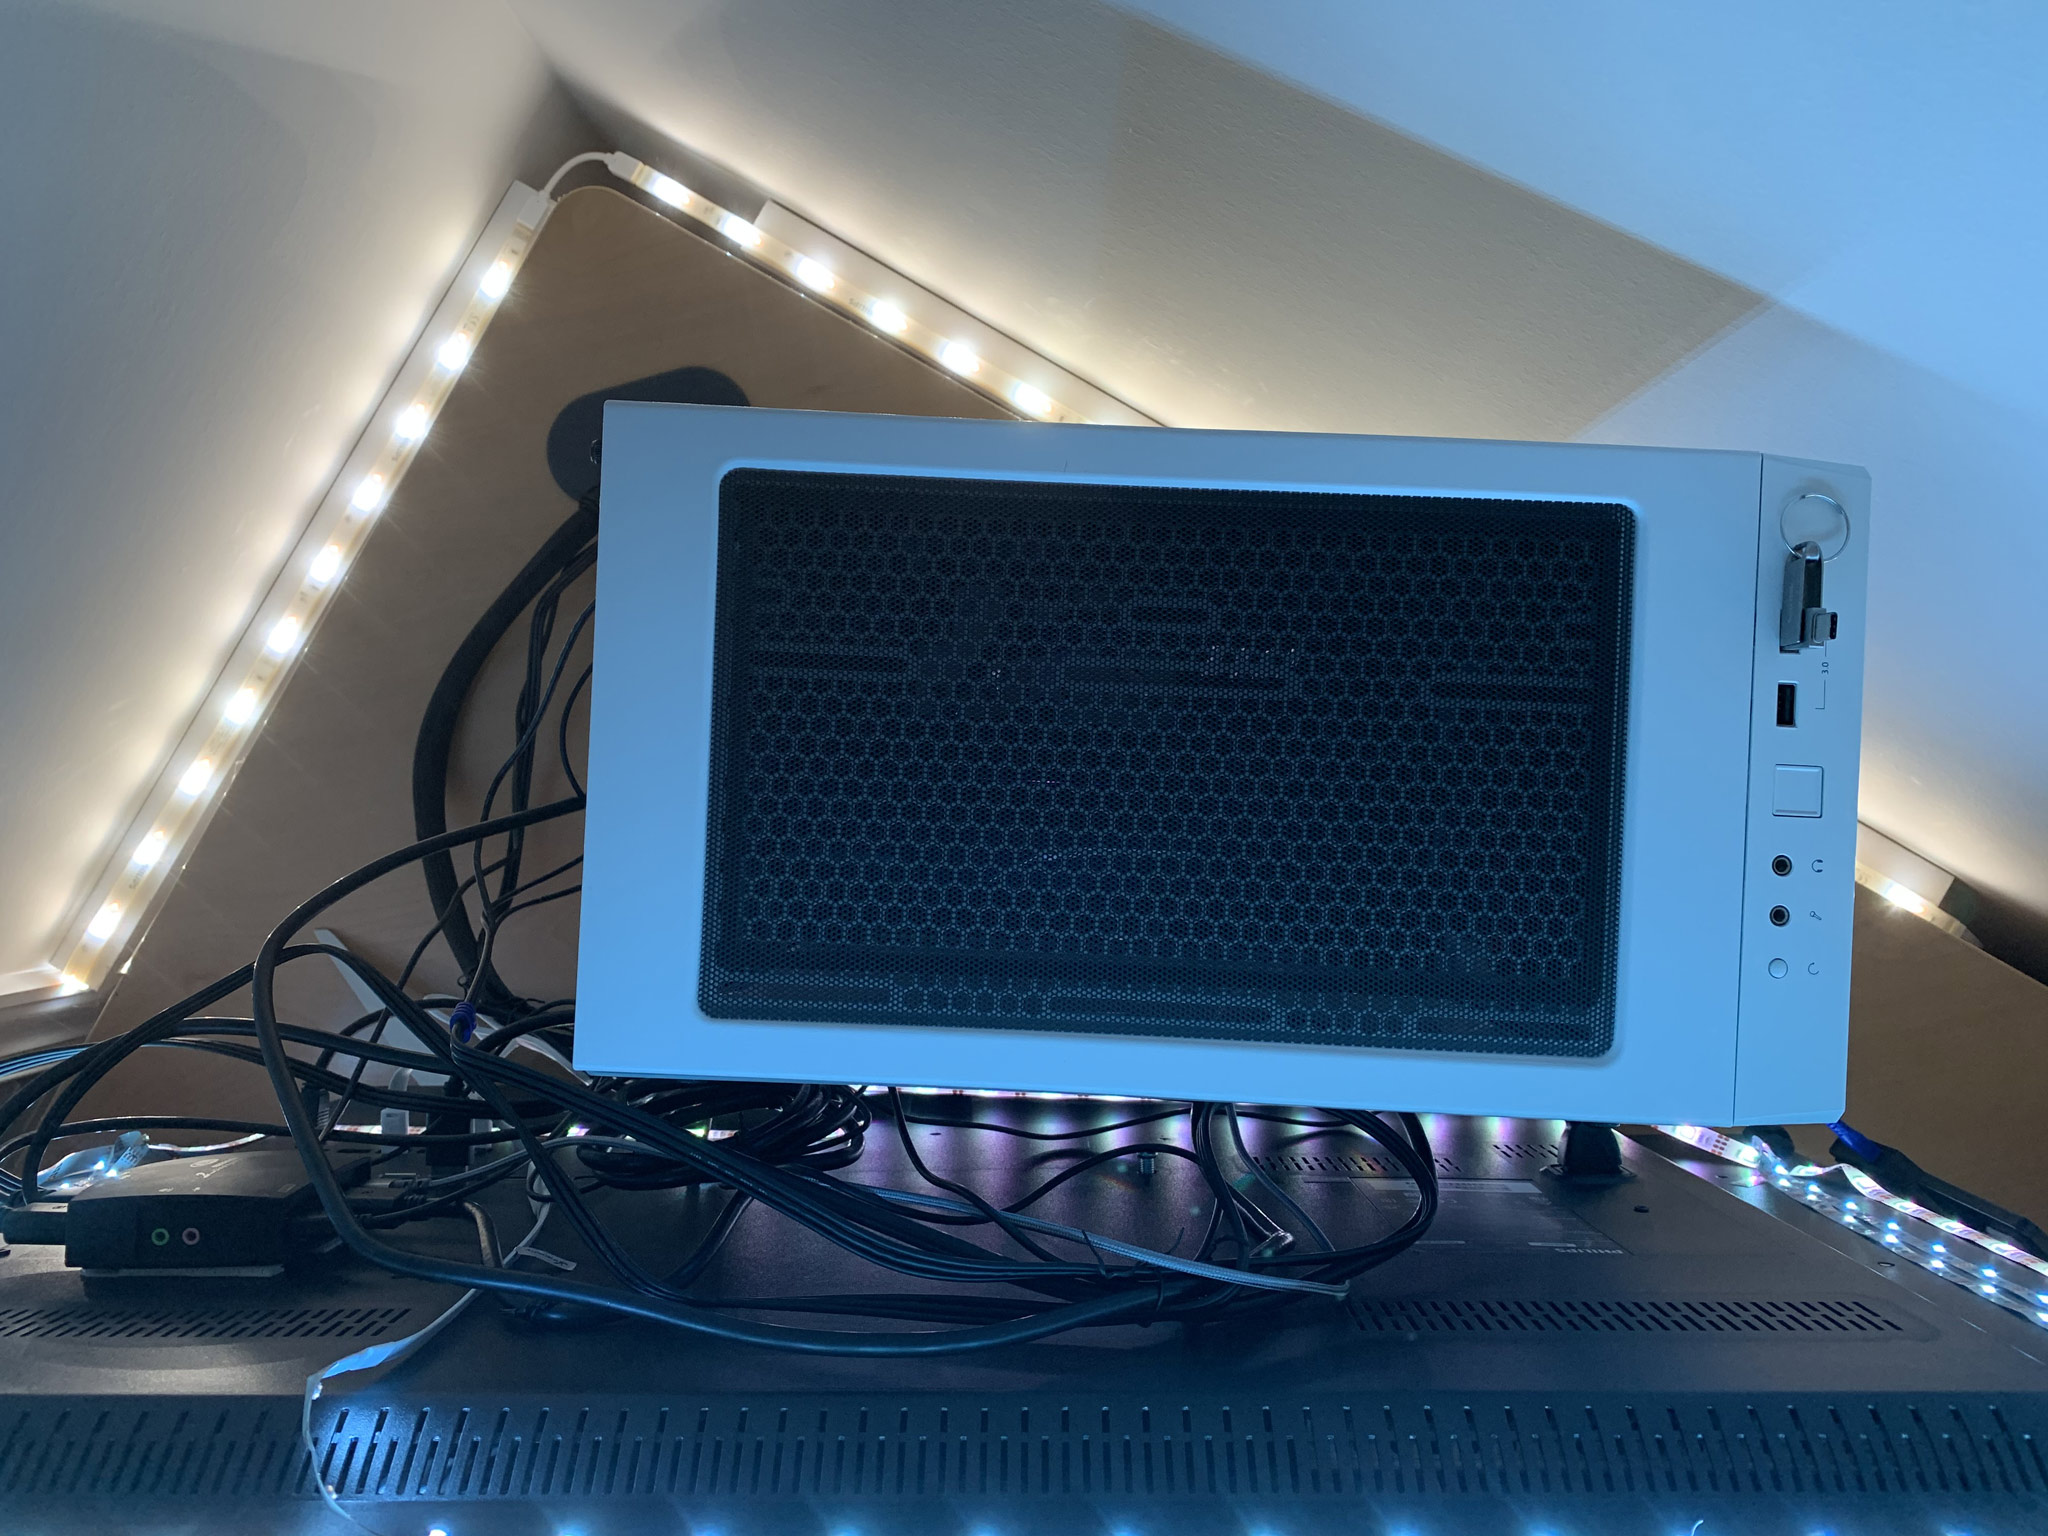
It is not the tidiest build in the world, but it's pretty clean from just about any angle:
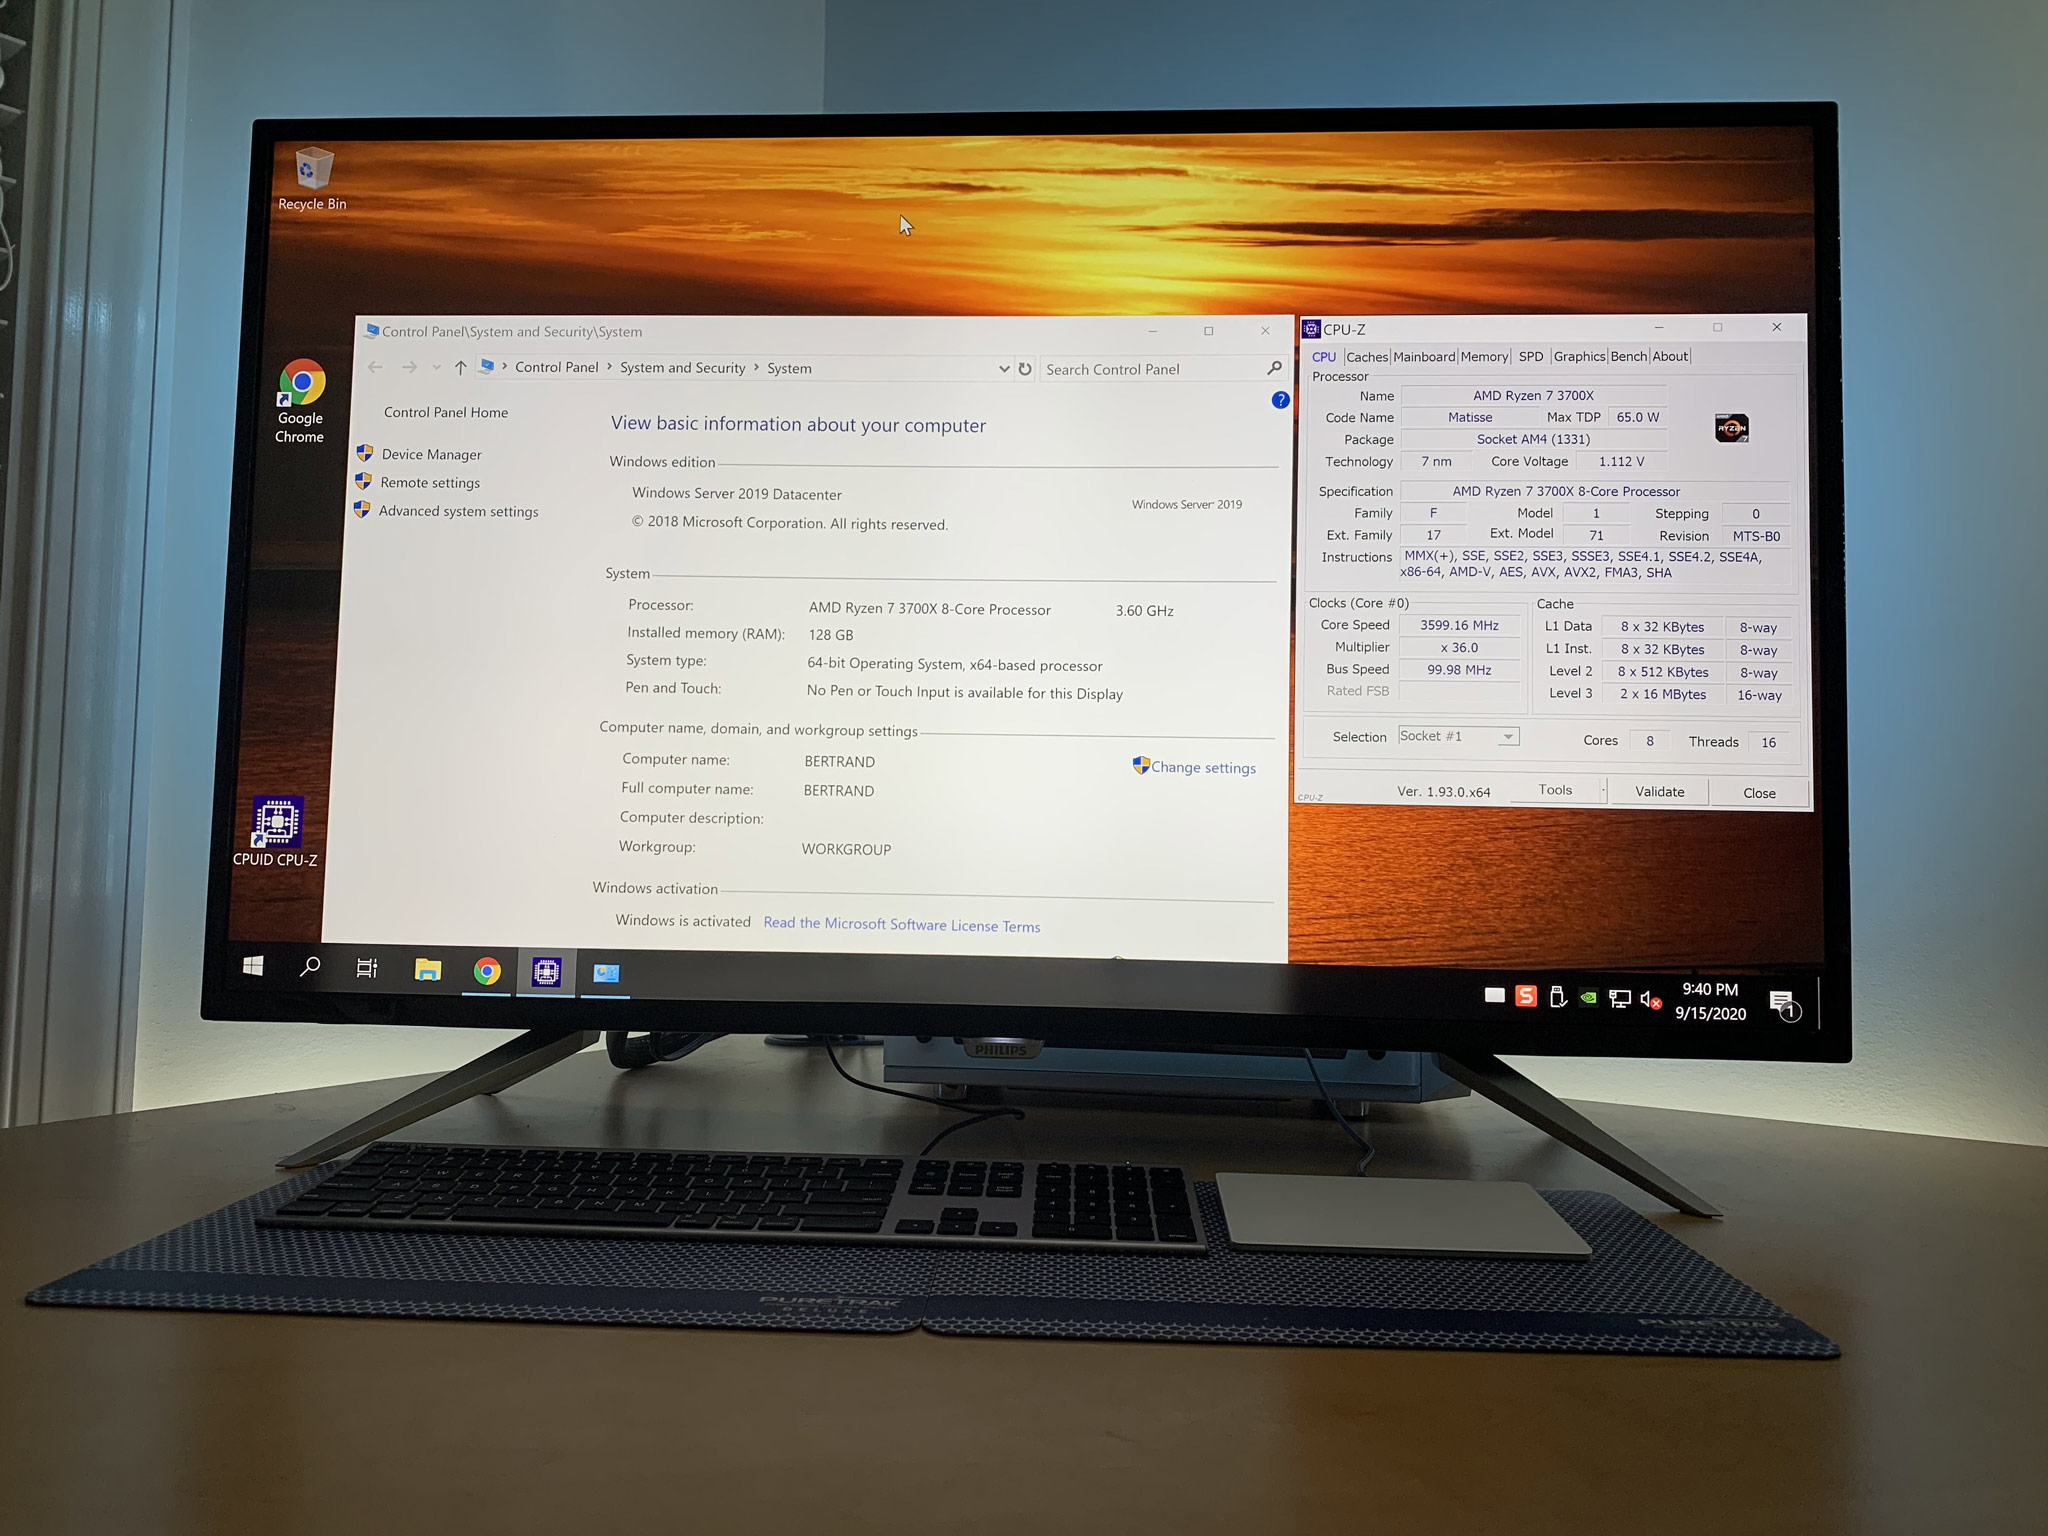
It's very quiet and so far runs quite cool. It takes a second or two to fully switch between Mac and PC, but that's all three devices, and not something I'll be doing constantly. The cost and work involved with the KVM is way better than buying another monitor and finding more space for it; perhaps I will invest in a higher-end KVM later.
Now I have to break down and recycle all these boxes, and figure out what kind of gift I need to send Glenn for all his help and patience, and to Melissa Connors for all her help evaluating wording and visuals (it's amazing how much more time I spent in HTML/CSS than actual building).
Shopping Comparison
I promised earlier that I'd give some more background on my build vs. buy decision. I'm comparing the base price, before tax and shipping, and without accessories. Even if a model ships from a manufacturer with a keyboard and mouse, I'm buying my own additional accessories in any case. I also don't need to compare motherboard, power supply, or case, because those typically aren't customizable from these vendors anyway. Here are a few of the options I checked out:
|
Lenovo | Dell | HP | Acer | Alienware | |||||||
|---|---|---|---|---|---|---|---|---|---|---|---|---|
| Component | My build | ThinkStation P340 | Precision 5820 | Z4 G4 Workstation | Predator Orion | Aurora R10 | ||||||
| CPU | Intel Xeon | Intel Xeon | Intel Xeon | Intel Core i7 | AMD Ryzen 9 | |||||||
| 8-core | 8-core | 8-core | 6-core | 16-core | ||||||||
| 3.4 GHz | 3.9 GHz | 3.9 GHz | 3.7 GHz | 3.5 GHz | ||||||||
| Memory | 128 GB | 32 GB | 32 GB | 128 GB | 32 GB | 128 GB | 32 GB | 64 GB | ||||
| Boot Drive | 1 TB M.2 NVMe | 1 TB NVMe | 256 GB SSD | 1 TB NVMe | 256 GB SSD | 2 TB NVMe | ||||||
| Graphics | NVidia 6 GB | NVidia 4 GB | AMD 4 GB | AMD 4 GB | NVidia 11 GB | NVidia 11 GB | ||||||
| Price | $1,470 | $1,693 | $2,104 | $3,894 | $3,100 | $5,198 | $3,300 | $4,205 | ||||
No slouches, for sure, but none of those match up. All the RAM is slower, most of the storage is from a brand you've likely never heard of, and several video cards are less capable. Lenovo comes kind of close on everything except the memory, but I couldn't find a way to get to 128GB anywhere. Acer doesn't seem to be customizable, but for $3,300 off the shelf, these seem like terrible and outdated specs (aside from the out-of-place video card). Only Alienware offers better overall specs than what I put together but, since you have to upgrade all four components together, the price jumps are extreme. And even at triple the price, while other components are slightly better, the memory option caps out at 64GB. So I stopped my search there. There are lots of vendors that make good kit, and while I can probably customize better by calling some of them, I don't think it's possible to do what I want at the price point I've already hit.
This site is great for working on builds. https://pcpartpicker.com/ Sadly it looks like it is down now.
Hi Aaron. I can see that a lot of work went into this. Nice system build, and I agree that building something for good performance with a lot of RAM is nearly impossible without going custom. Most of my PCs over the past several years have been custom for this reason.
Nice build and a very extensive blog post! If you ever need more CPU horsepower than a Ryzen 7 3700X, you can drop in a Ryzen 9 3900X, Ryzen 9 3950X, or one of the upcoming Zen 3 AM4 processors in that system.