
[2020-03-22: Part 2 and Part 3 are available.]
Moving to Wayfair meant spending a lot more time in my home office compared to commuting to an office in South Charlotte. When we moved from Rhode Island, I brought a whole slew of desks I had in my home office there. They are Bush Series A in beech top / slate base, and they are tanks. I've had them for about 15 years, most of them have gone through two moves, and they still look pretty much brand new.
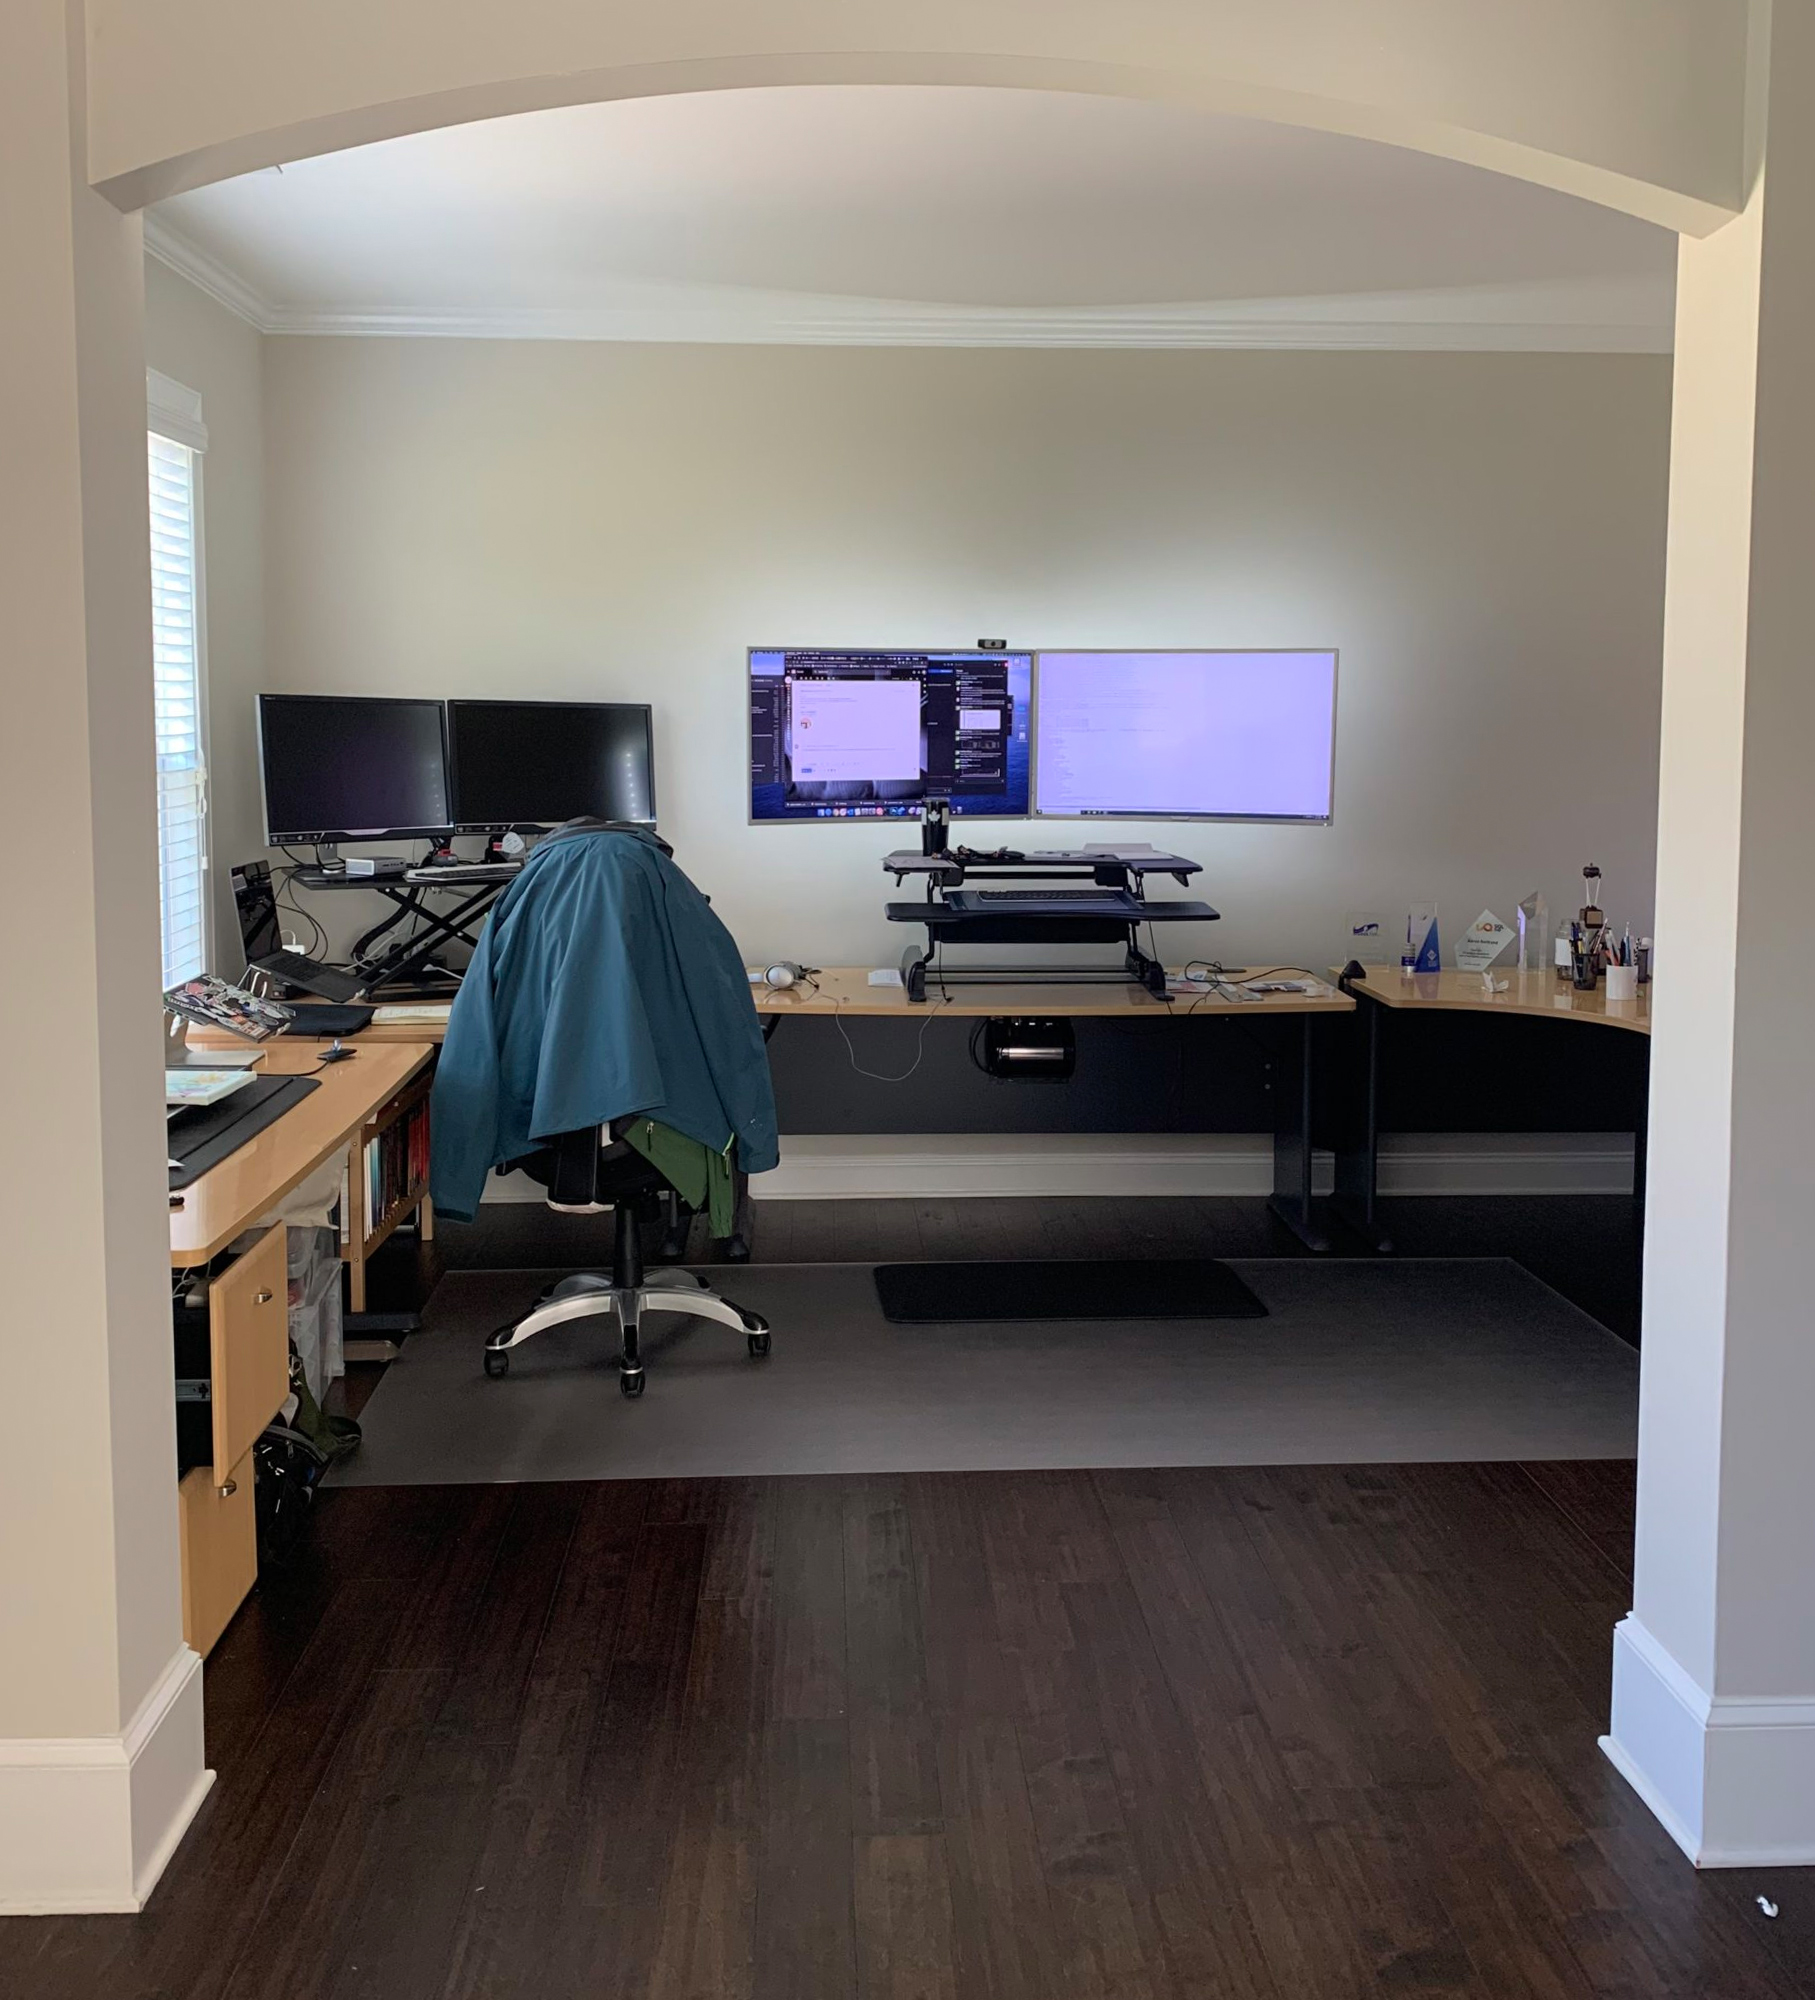 While you see a chair there, and all the desks are sitting height, I stand 98% of the time. I mounted my centerpiece monitors – 40" curved Philips BDM4037UW, which sadly they don't sell anymore – after we had barely moved in. My favorite part of this setup is that the DisplayPort cables, power, and USB are all hidden in the wall. I fished them through after making two gang holes using this handy gang cutter esteemed colleague Nick Craver pointed out to me a while back, and these simple pass-throughs. The monitors on the corner desk are also Philips – 28" 288P6LJEB – and I highly recommend them if you have less space to work with (or just don't want ginormous monitors). They're flat, not curved, though.
In order to stand comfortably, I had a couple of standing desk converters: a Stand Steady 36" Elite XL and a Varidesk ProPlus 36". These worked well enough, and are an affordable way to see if standing is right for you. The limitations in both of these sit-stand converters for me were the ability to support any leaning or writing weight and no place to hide wires. And, quite frankly, the lack of surface area at the right height was frustrating, even without any monitor footprint. I always have a Moleskine notebook or two, along with pens, keys, headphones, sunglasses, bills, wallet, and a variety of other miscellanoues things lying about.
So I started looking into dedicated standing desks. I looked first at a variety of motorized, adjustable height desks, including Autonomous, UpDesk, xDesk, and the Jarvis. Even IKEA has one. While they are nice, I don't need all the bells and whistles; I don't even need the thing to move. I just want a sturdy desk that is always at 42"-43" height. When I want to sit (and I should strive to do that more often), I can go to a chair at another desk, or take my laptop and plop my butt on a couch. So I ultimately landed on an 80" x 30" fixed height desk from Uplift. The leg frames are 41" and the surface is 1" thick, so it's right at 42" – I probably should want it a little bit higher, but I'm going to see how it goes.
As an aside, I highly recommend some kind of standing mat; I have two 39" x 20" mats made by Kangaroo (one to stand on, and one that I used to use at work but that I currently use as a giant mouse pad).
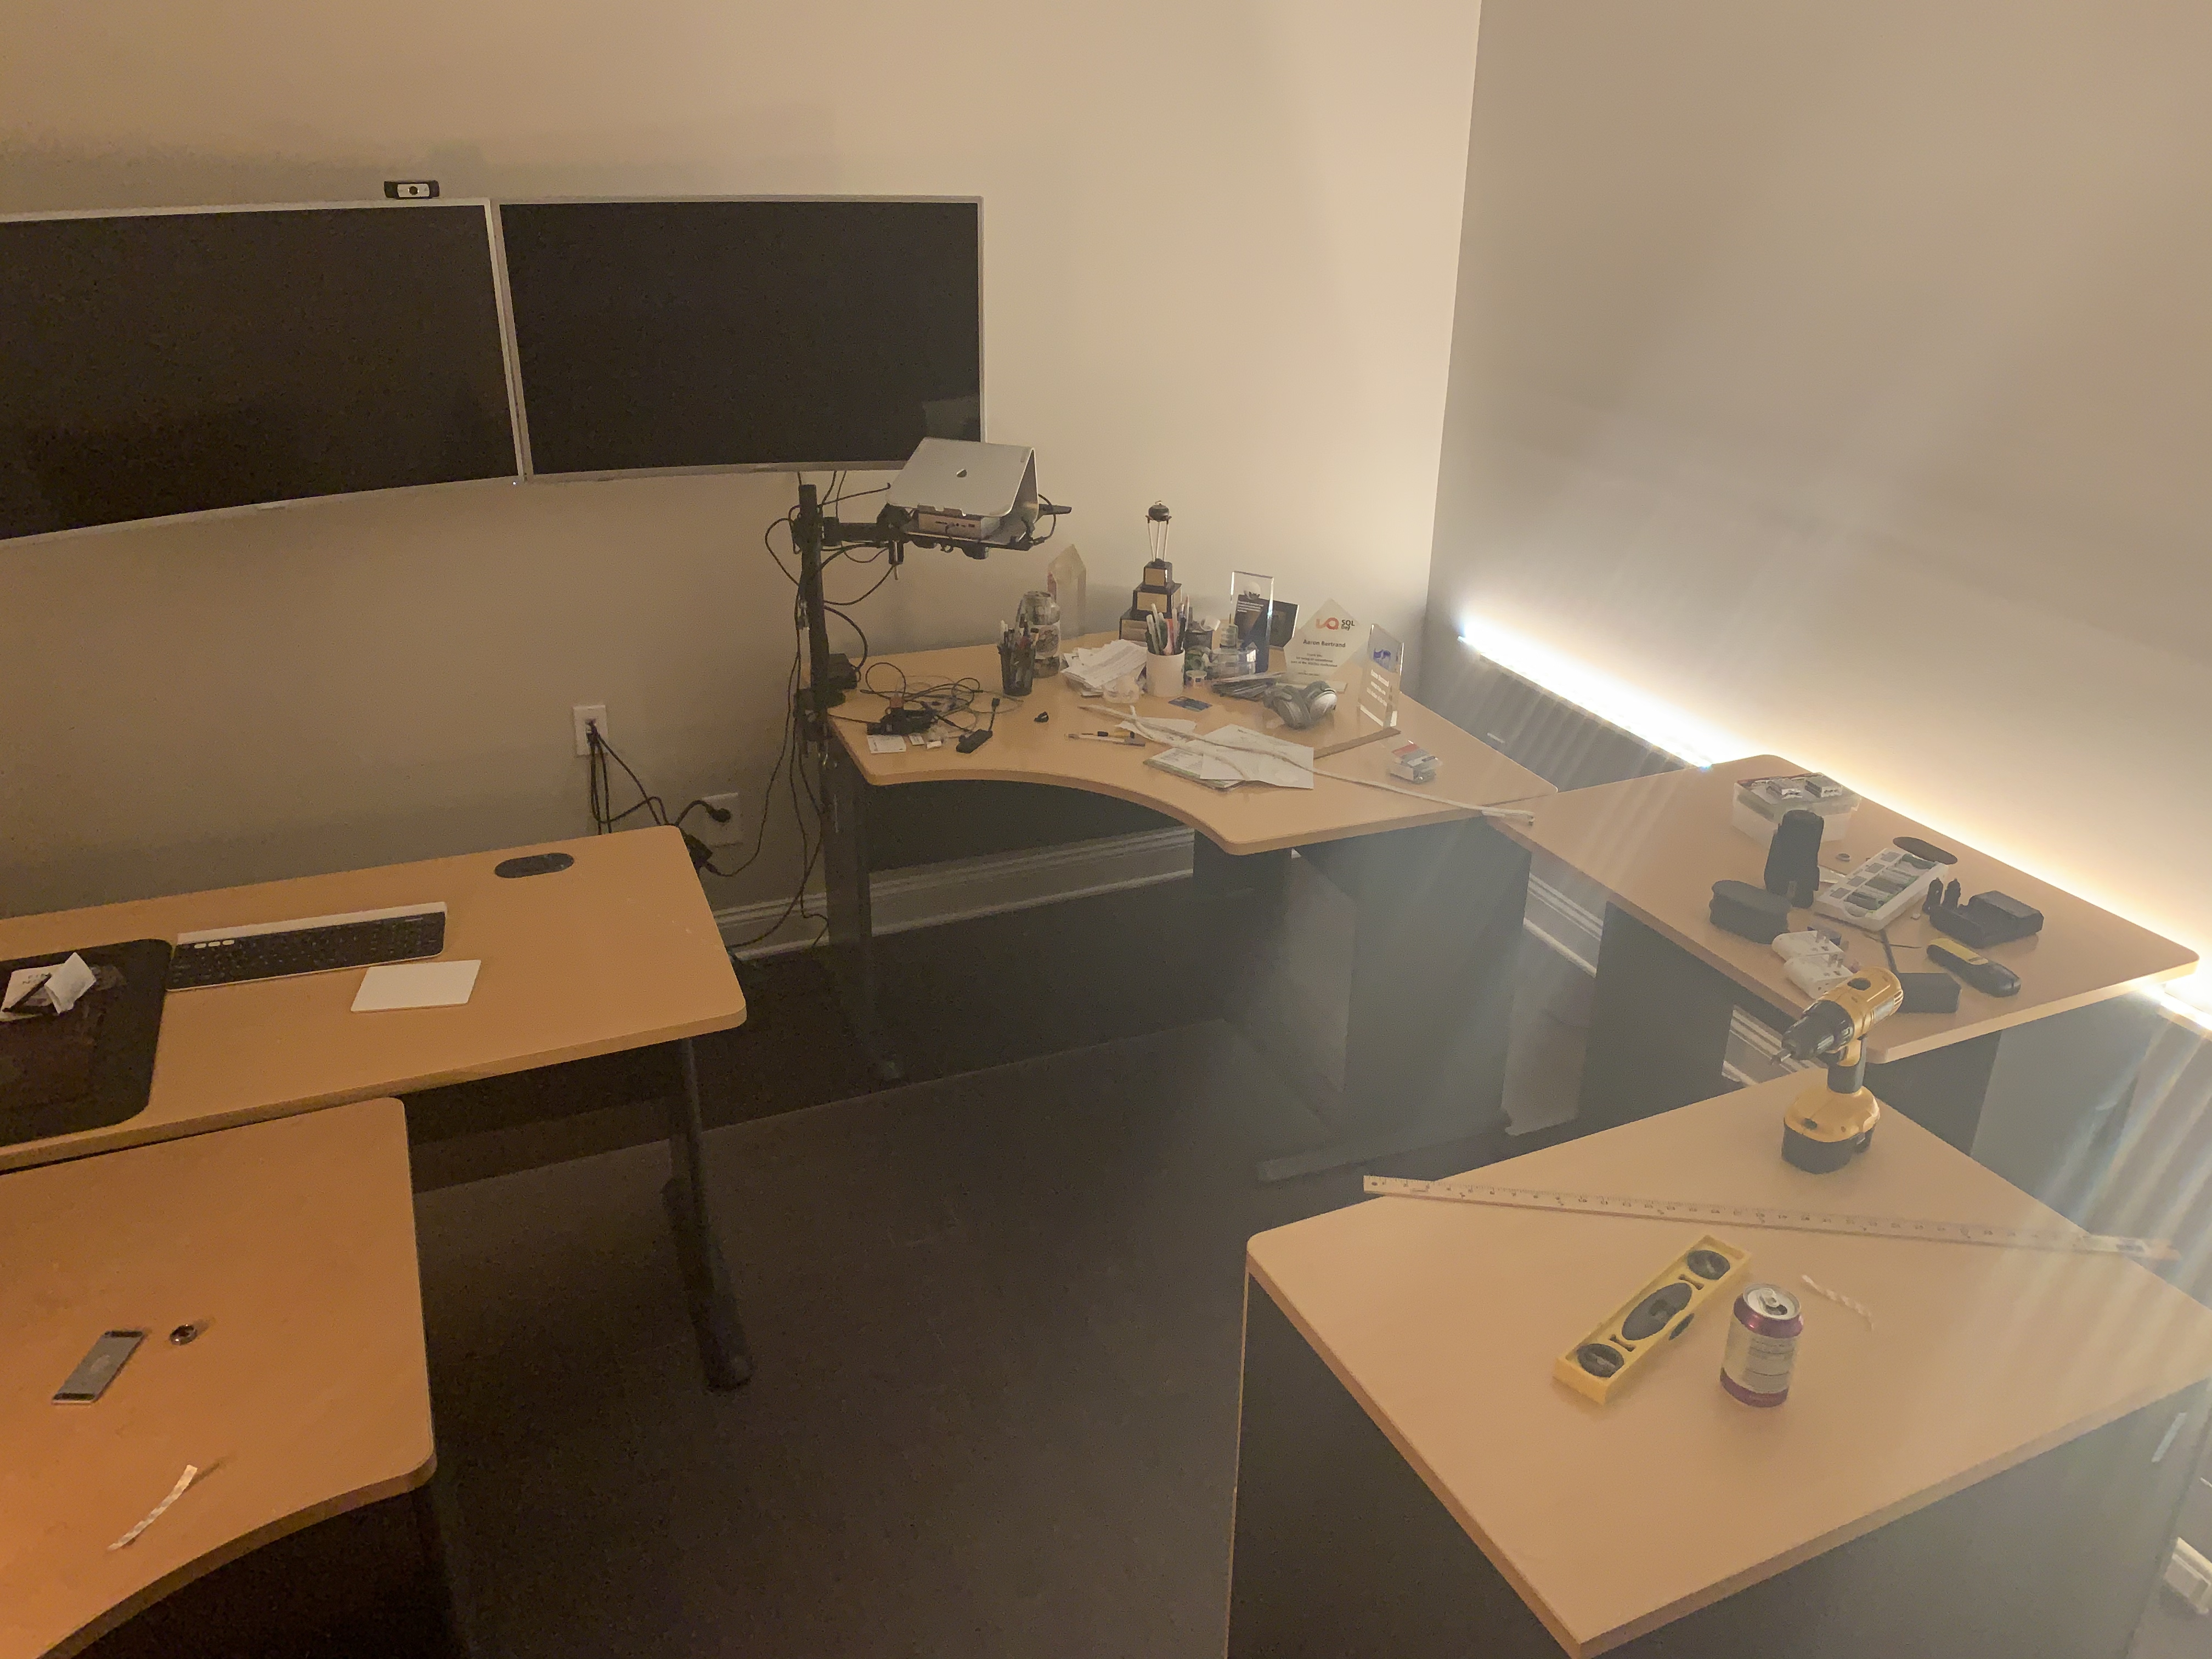
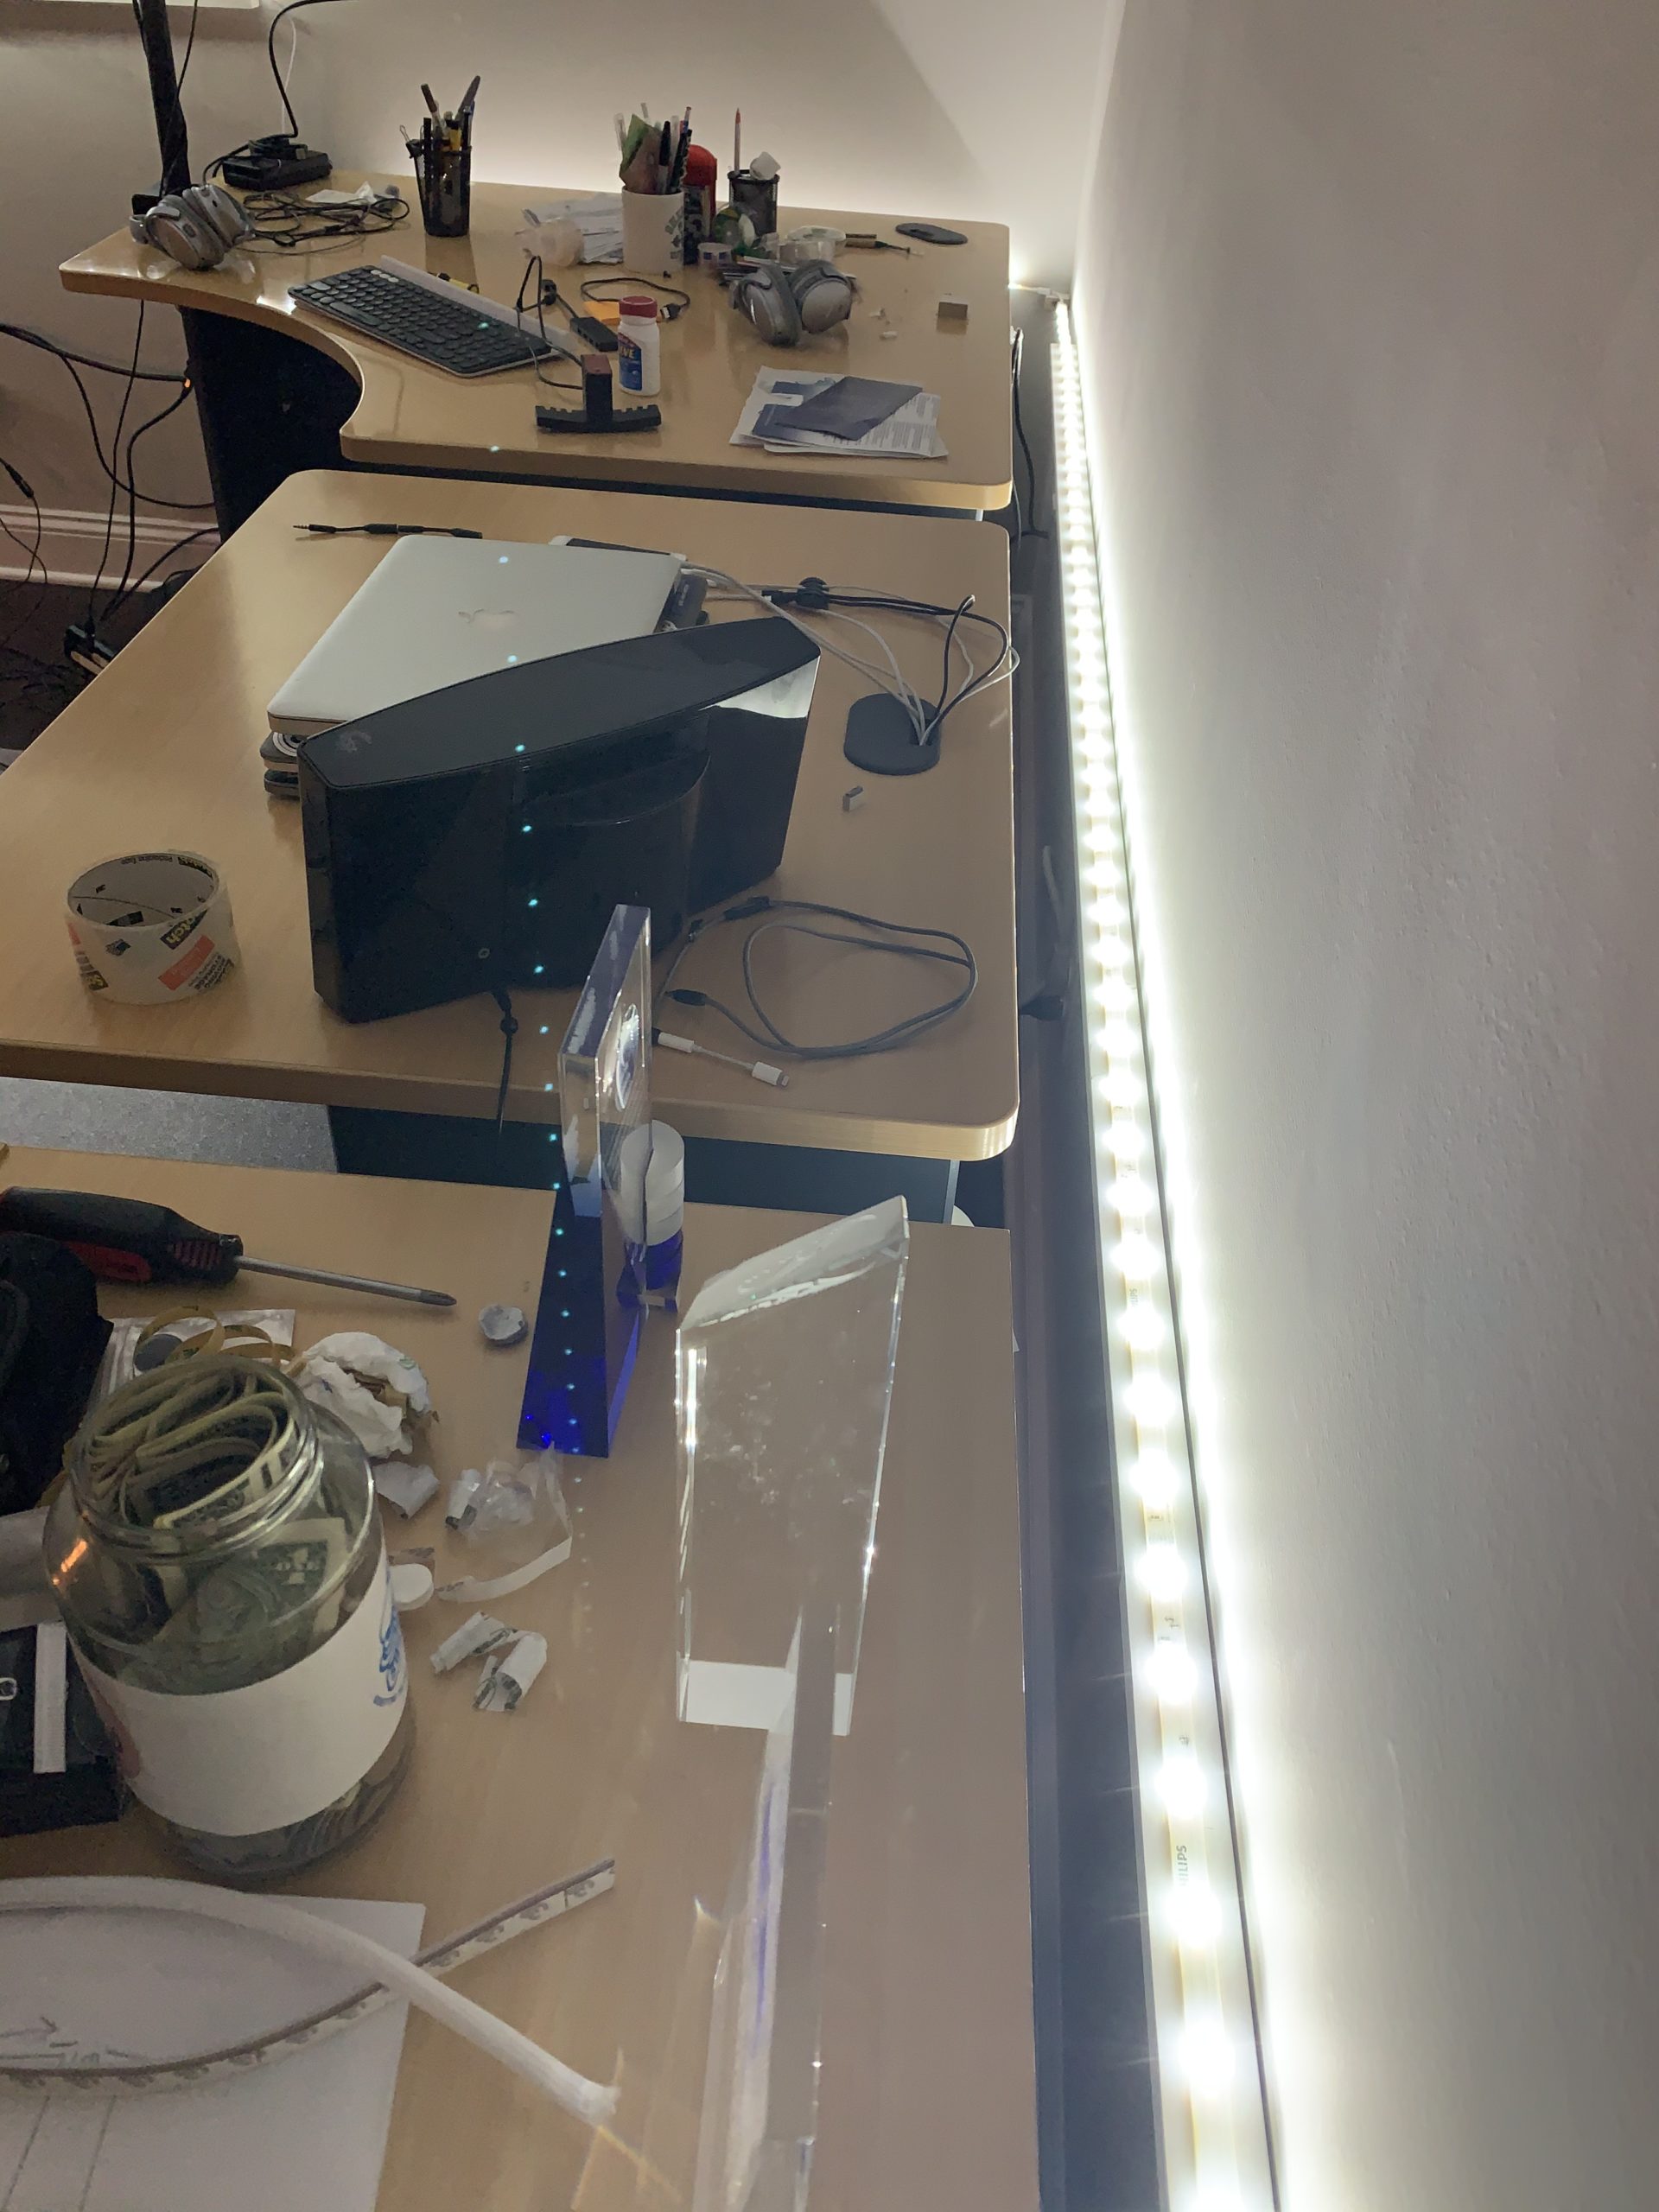
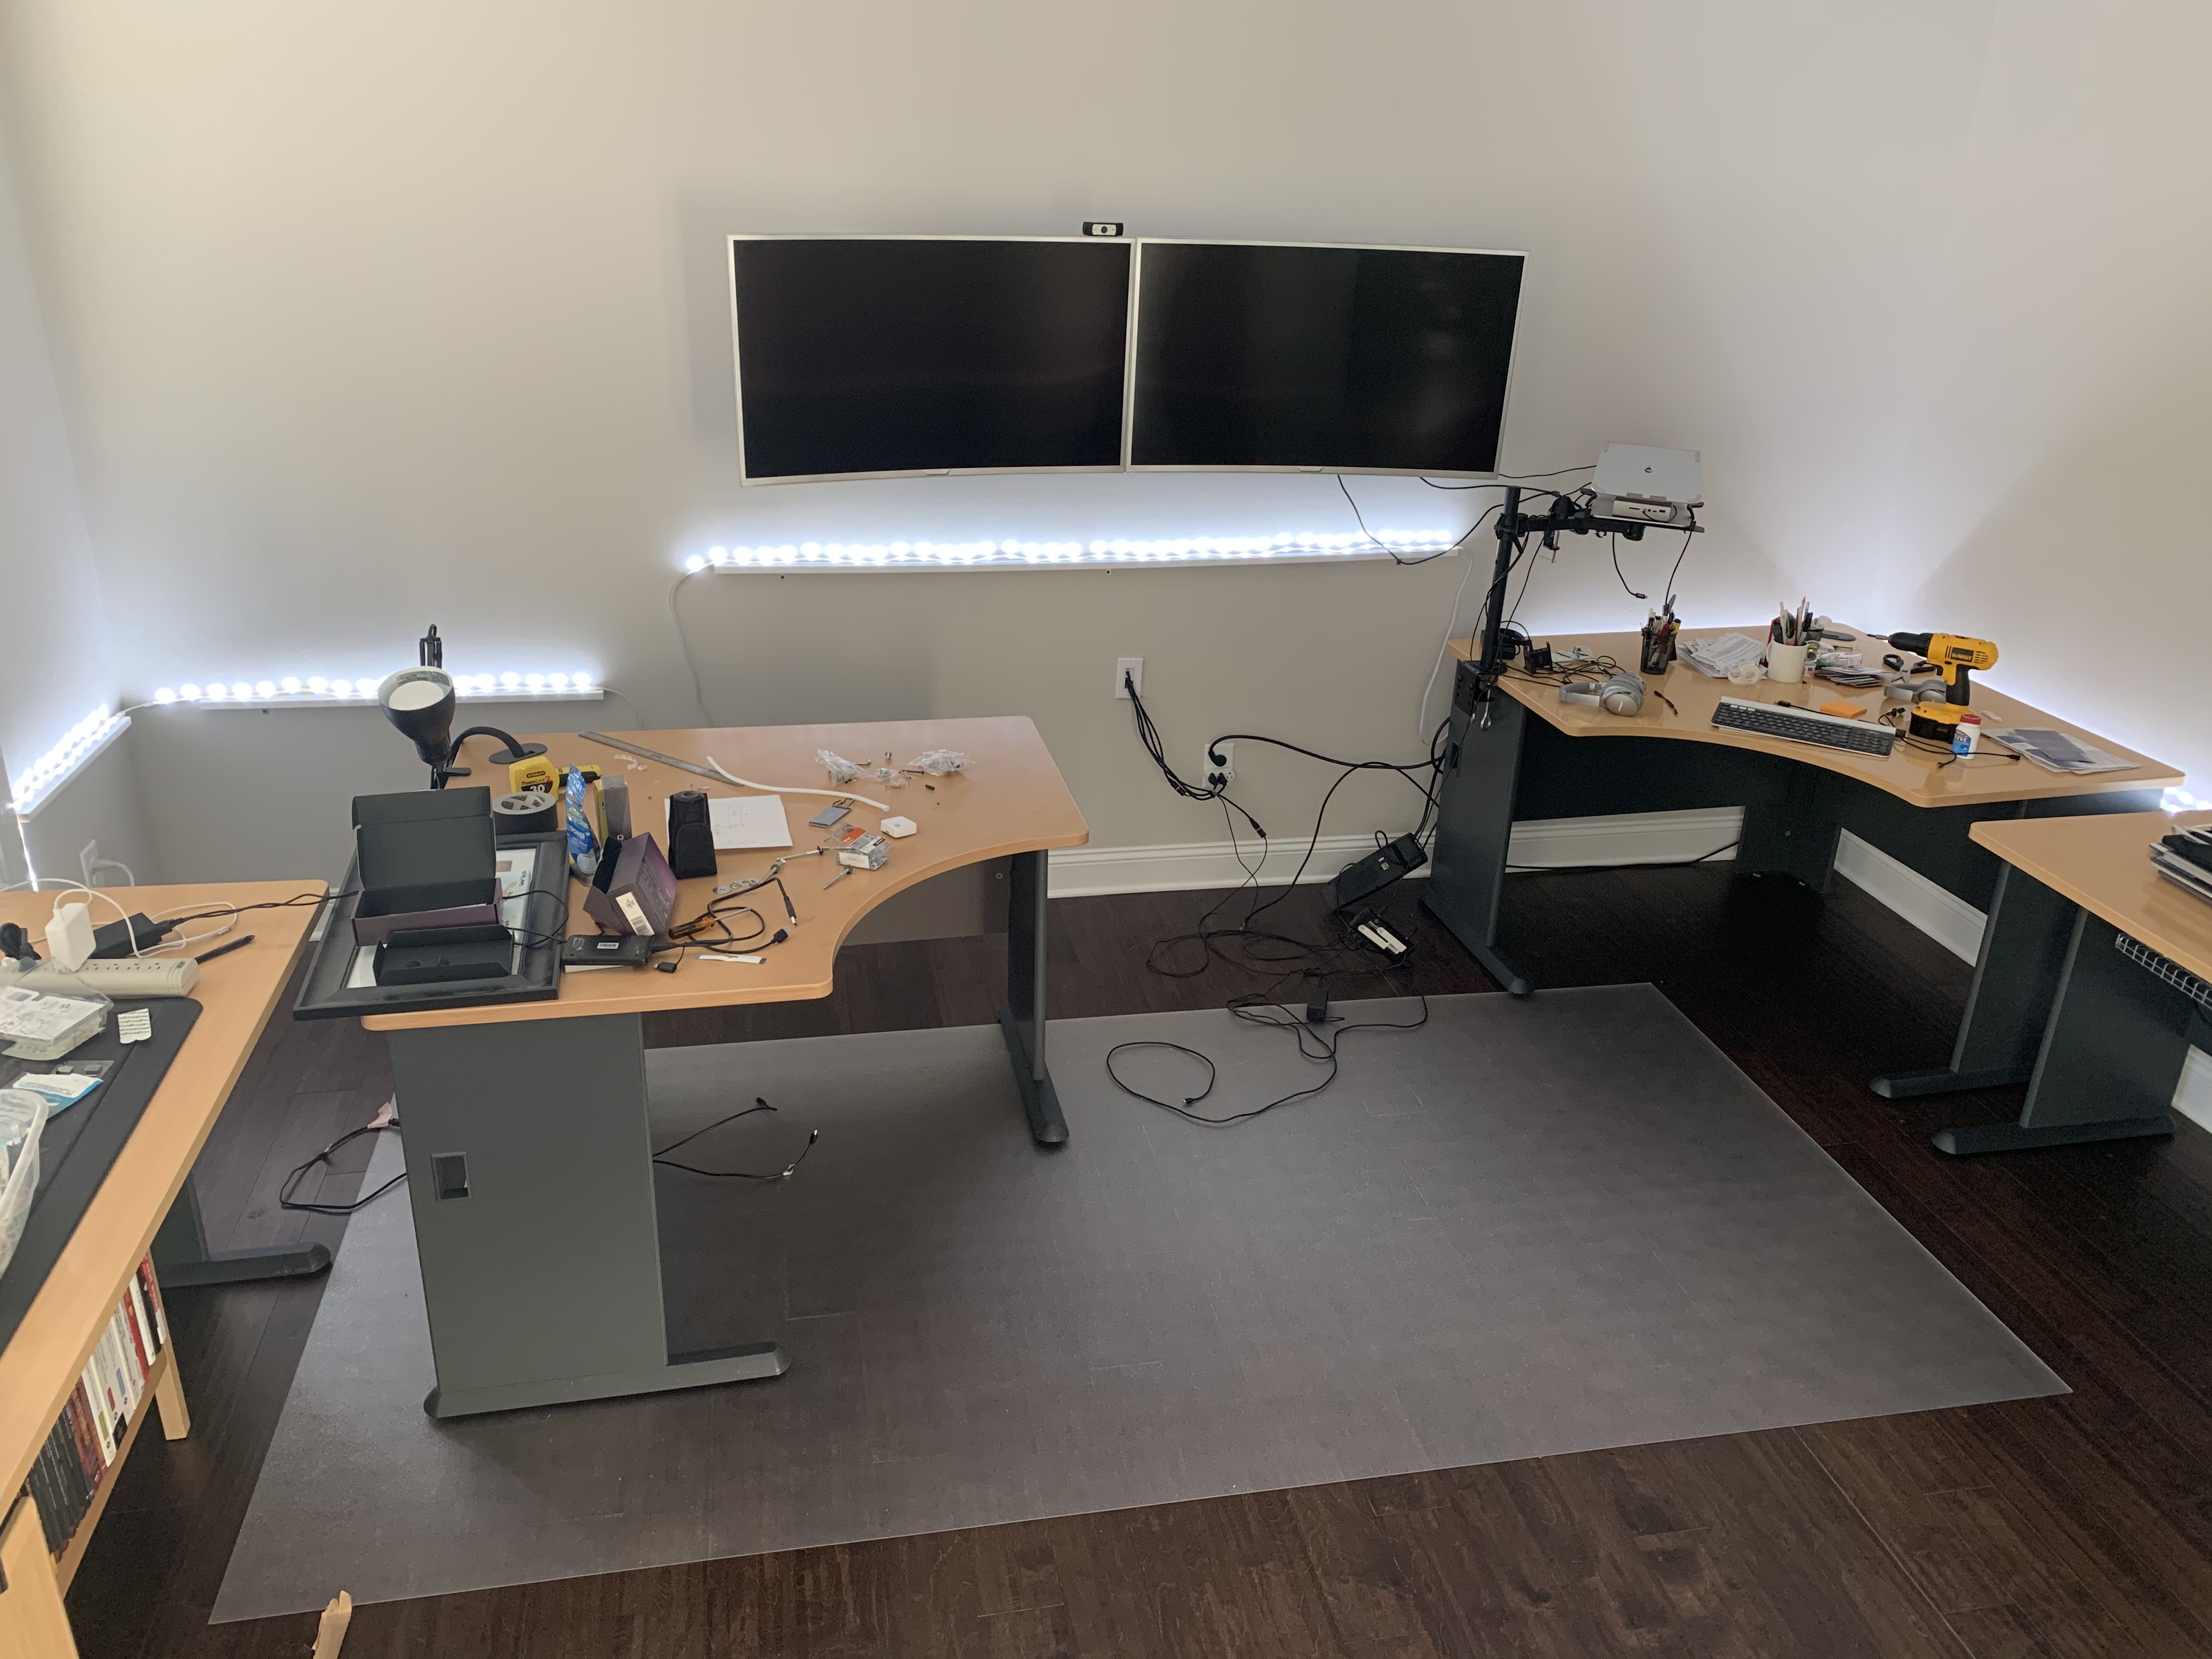
The desk will go right in the center there, under the big monitors. But first I need to remove what's there and re-do the backlighting. This is the only room in the entire house without a ceiling fixture, so on the backs of the monitors I have Vansky USB LED strips (currently unavailable, and there are many alternatives, but they were the only ones I've seen that have a non-blue-tinted "white"). And behind the desk is a Philips Hue light strip + two 40" extensions sitting precariously on 2x4s I mounted onto the back of the three desks against the monitor wall (way too embarrassed to show that janky setup before I took it down). I use this motion sensor to fire up all the lights when I walk into the office, but home automation is imperfect: if you shut things down before leaving the room, the motion of leaving the room turns them back on. A similar workflow occurs in our closets – you walk in, the lights turn on, but because there's a timeout, if you aren't moving near the door, the lights will turn off (and then turn on again when you leave).
 At right is how the backlighting started off; only on the monitor wall.
This 2" x 4" shelving was not the most stable solution, and made it very difficult to ever move a desk. It also wouldn't work for the new standing desk, because that doesn't have a solid back to attach a shelf (more on that in part 2). So I pulled all the desks out, and started mounting shelves for the lighting on the wall, like I should have done when I put the office together the first time. I would have to raise the shelf in the middle to account for the higher desk surface. I also added multiple light strip extensions to cover the adjacent wall (away from the window – don't need lighting there). Total linear coverage for those two walls is about 300" (25'), so I have one base lightstrip (80") and six 40" extensions. This is starting to approach their stated support of 10 meters (393.7"); if I decide to add more coverage later, I'll invest in a second base.
I went with a very basic solution for the shelves, and I hesitate to even call them shelves because they're not designed to hold anything except the light strips. I got the equivalent of these from my local hardware shop:
- four pine 1x2s (8') in white, which I then cut to fit in lengths slightly shorter than each desk width (34" and 76");
- 16 1.5" corner braces (I only needed 15, but they only come in 4-packs); and,
- wood screws (#6 x 1" to go into the wall, #6 x 1/2" to go into the bottom of the shelf).
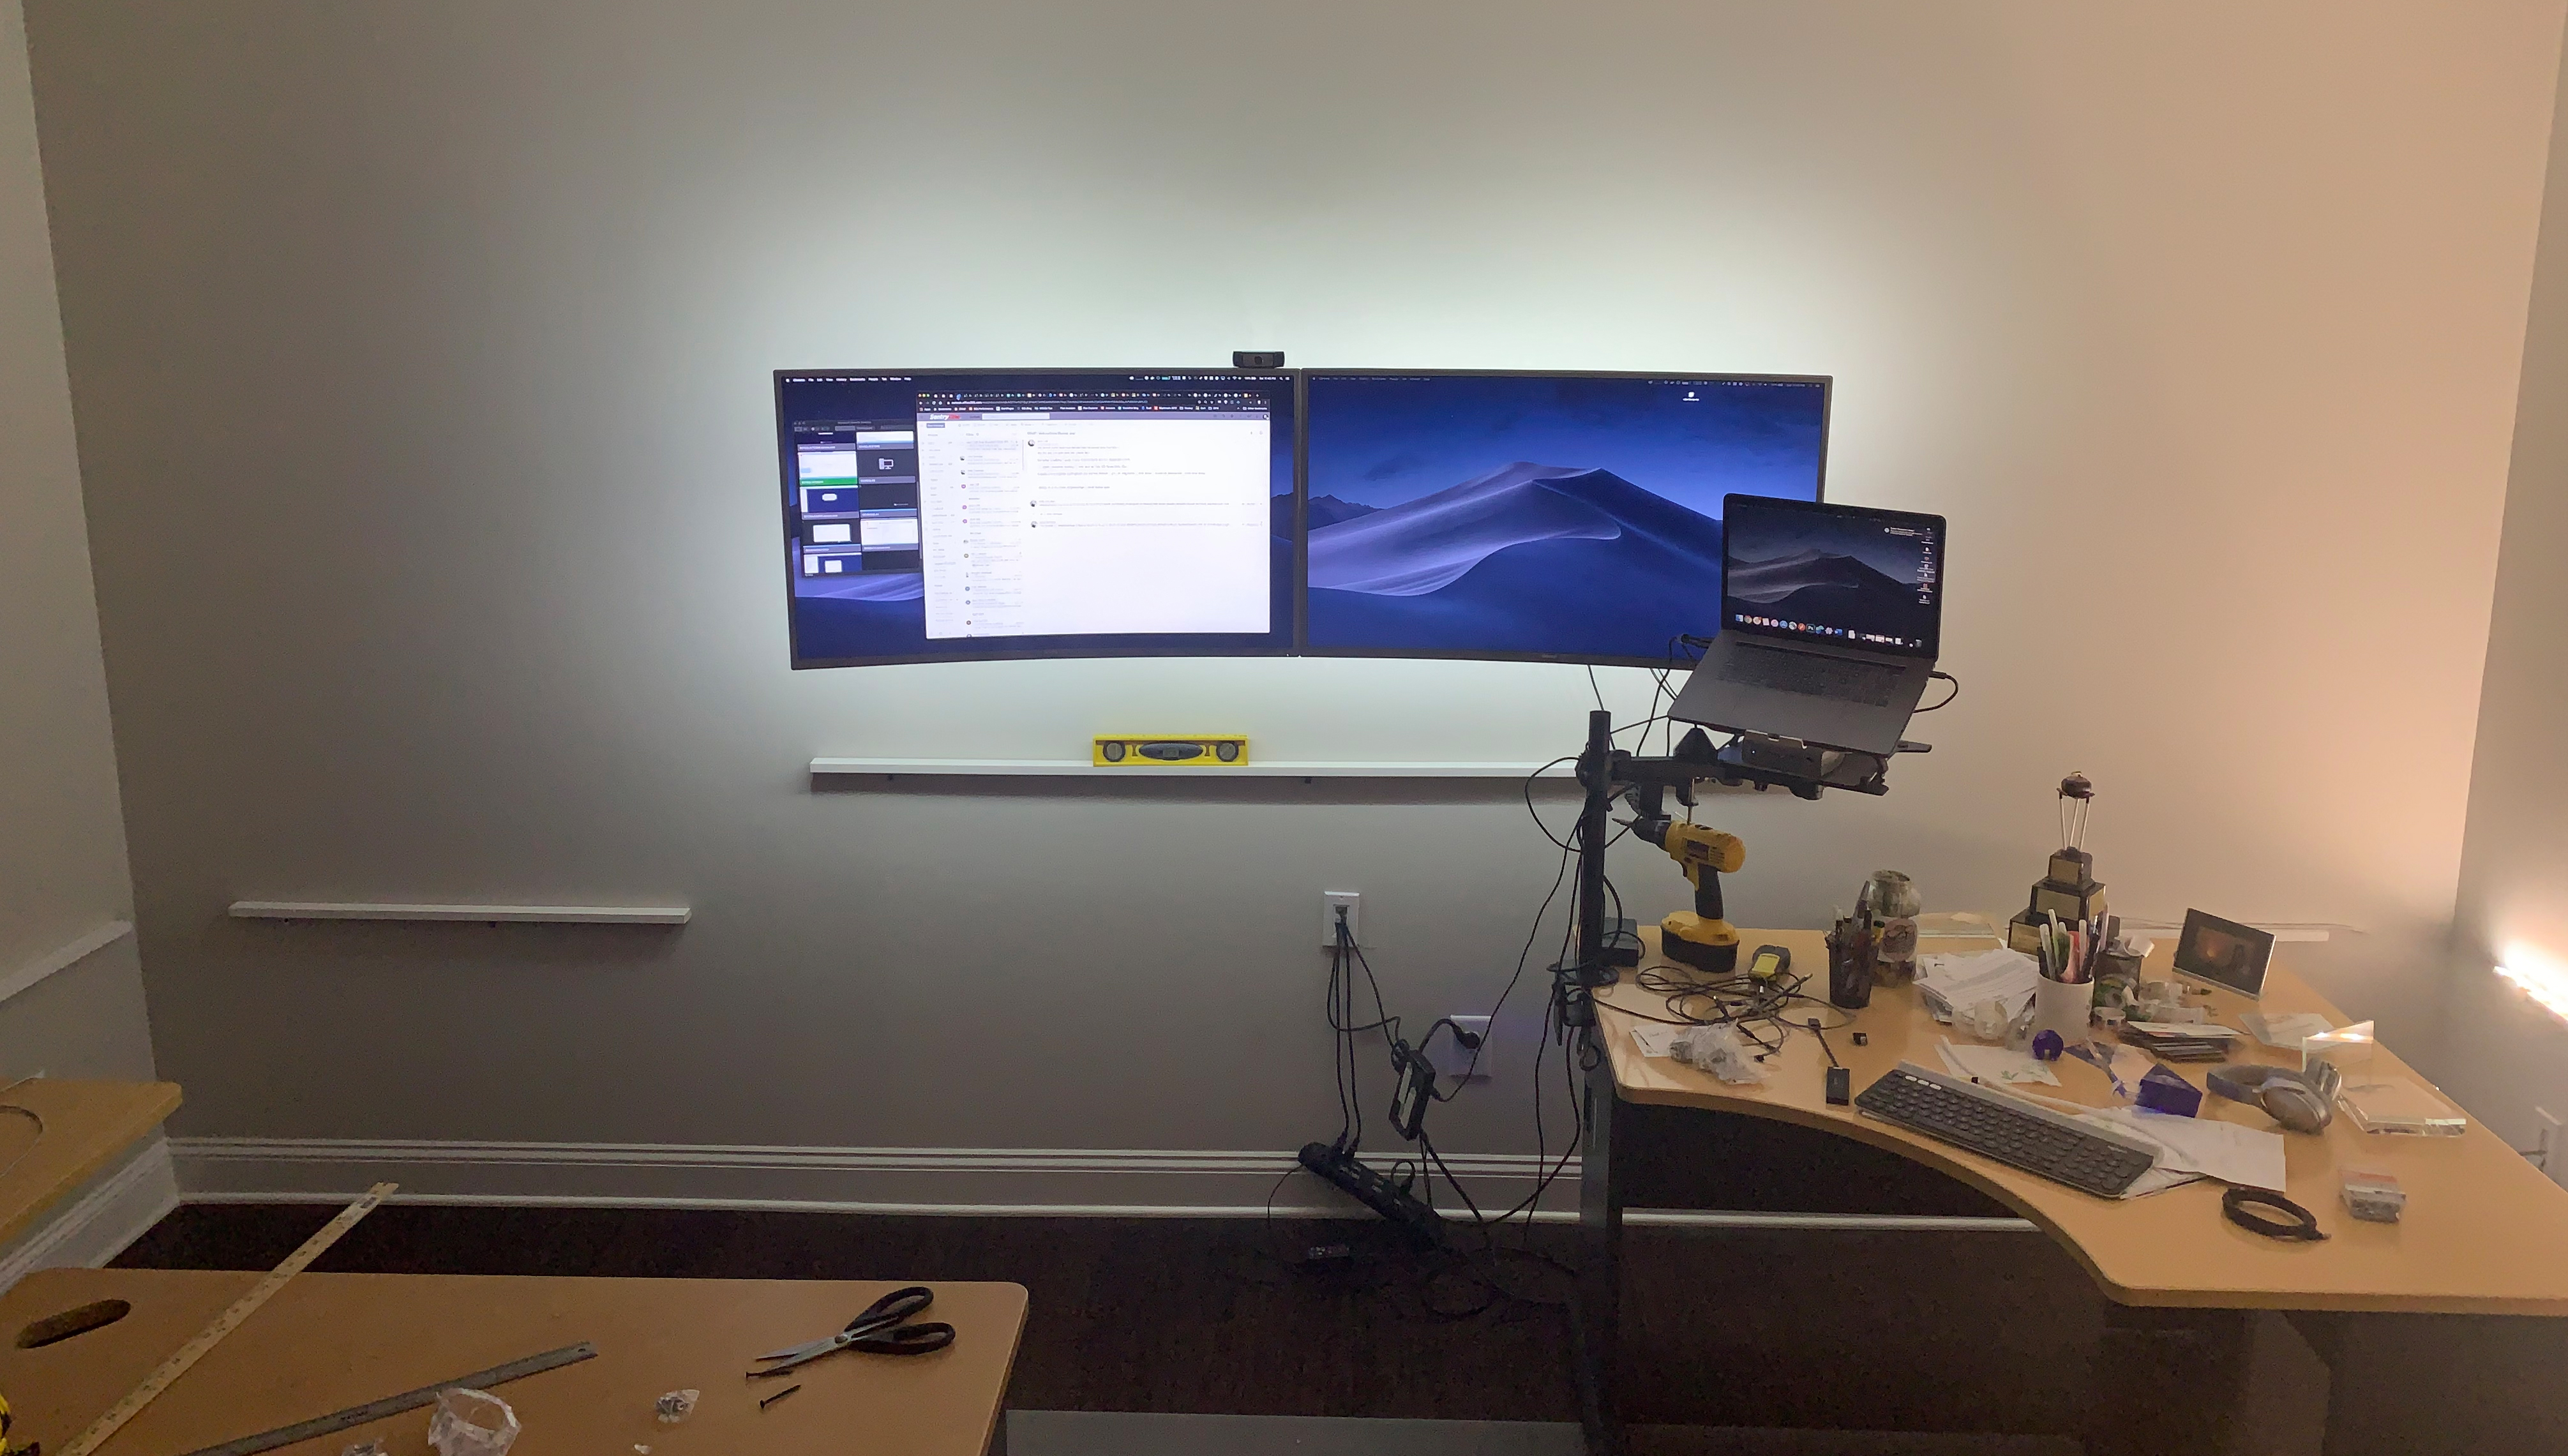
I put the screws directly into studs, not because the shelf needs to support any weight, but because it’s much easier than dealing with drywall. I pointed the Ls down so that none of the bracket would appear above the shelf; maybe that wasn't the best choice, but it works. Again, these aren't supporting a lot of weight. I measured so the top of the shelf would be about 4" below the desk surface, because you don't really want to look at these LEDs straight on (and seeing the bulbs kind of ruins the magic of backlighting).
I used some basic 3M Command strips that I cut to fit in order to affix the lightstrips to the shelf, pointing up. Yes, the lightstrips come with their own adhesive backing, but the paper you peel off to expose the sticky part more often than not pulled the adhesive strip with it. Don't use the sticker only style of Command strips; the velcro is more forgiving, easier to adjust, and doesn't lose any of its velcro-y goodness over time (the sticky side will eventually wear out, though not so much when it's lying horizontal and nothing is pulling on it). And I used these lightstrip extension cables to lightlessly bridge the gaps between the higher and lower shelves. Note that the lightstrip doesn't bend well at corners, but some advice: don't buy connectors like these just to join extensions at corners; each extension now comes with one, so I returned them.
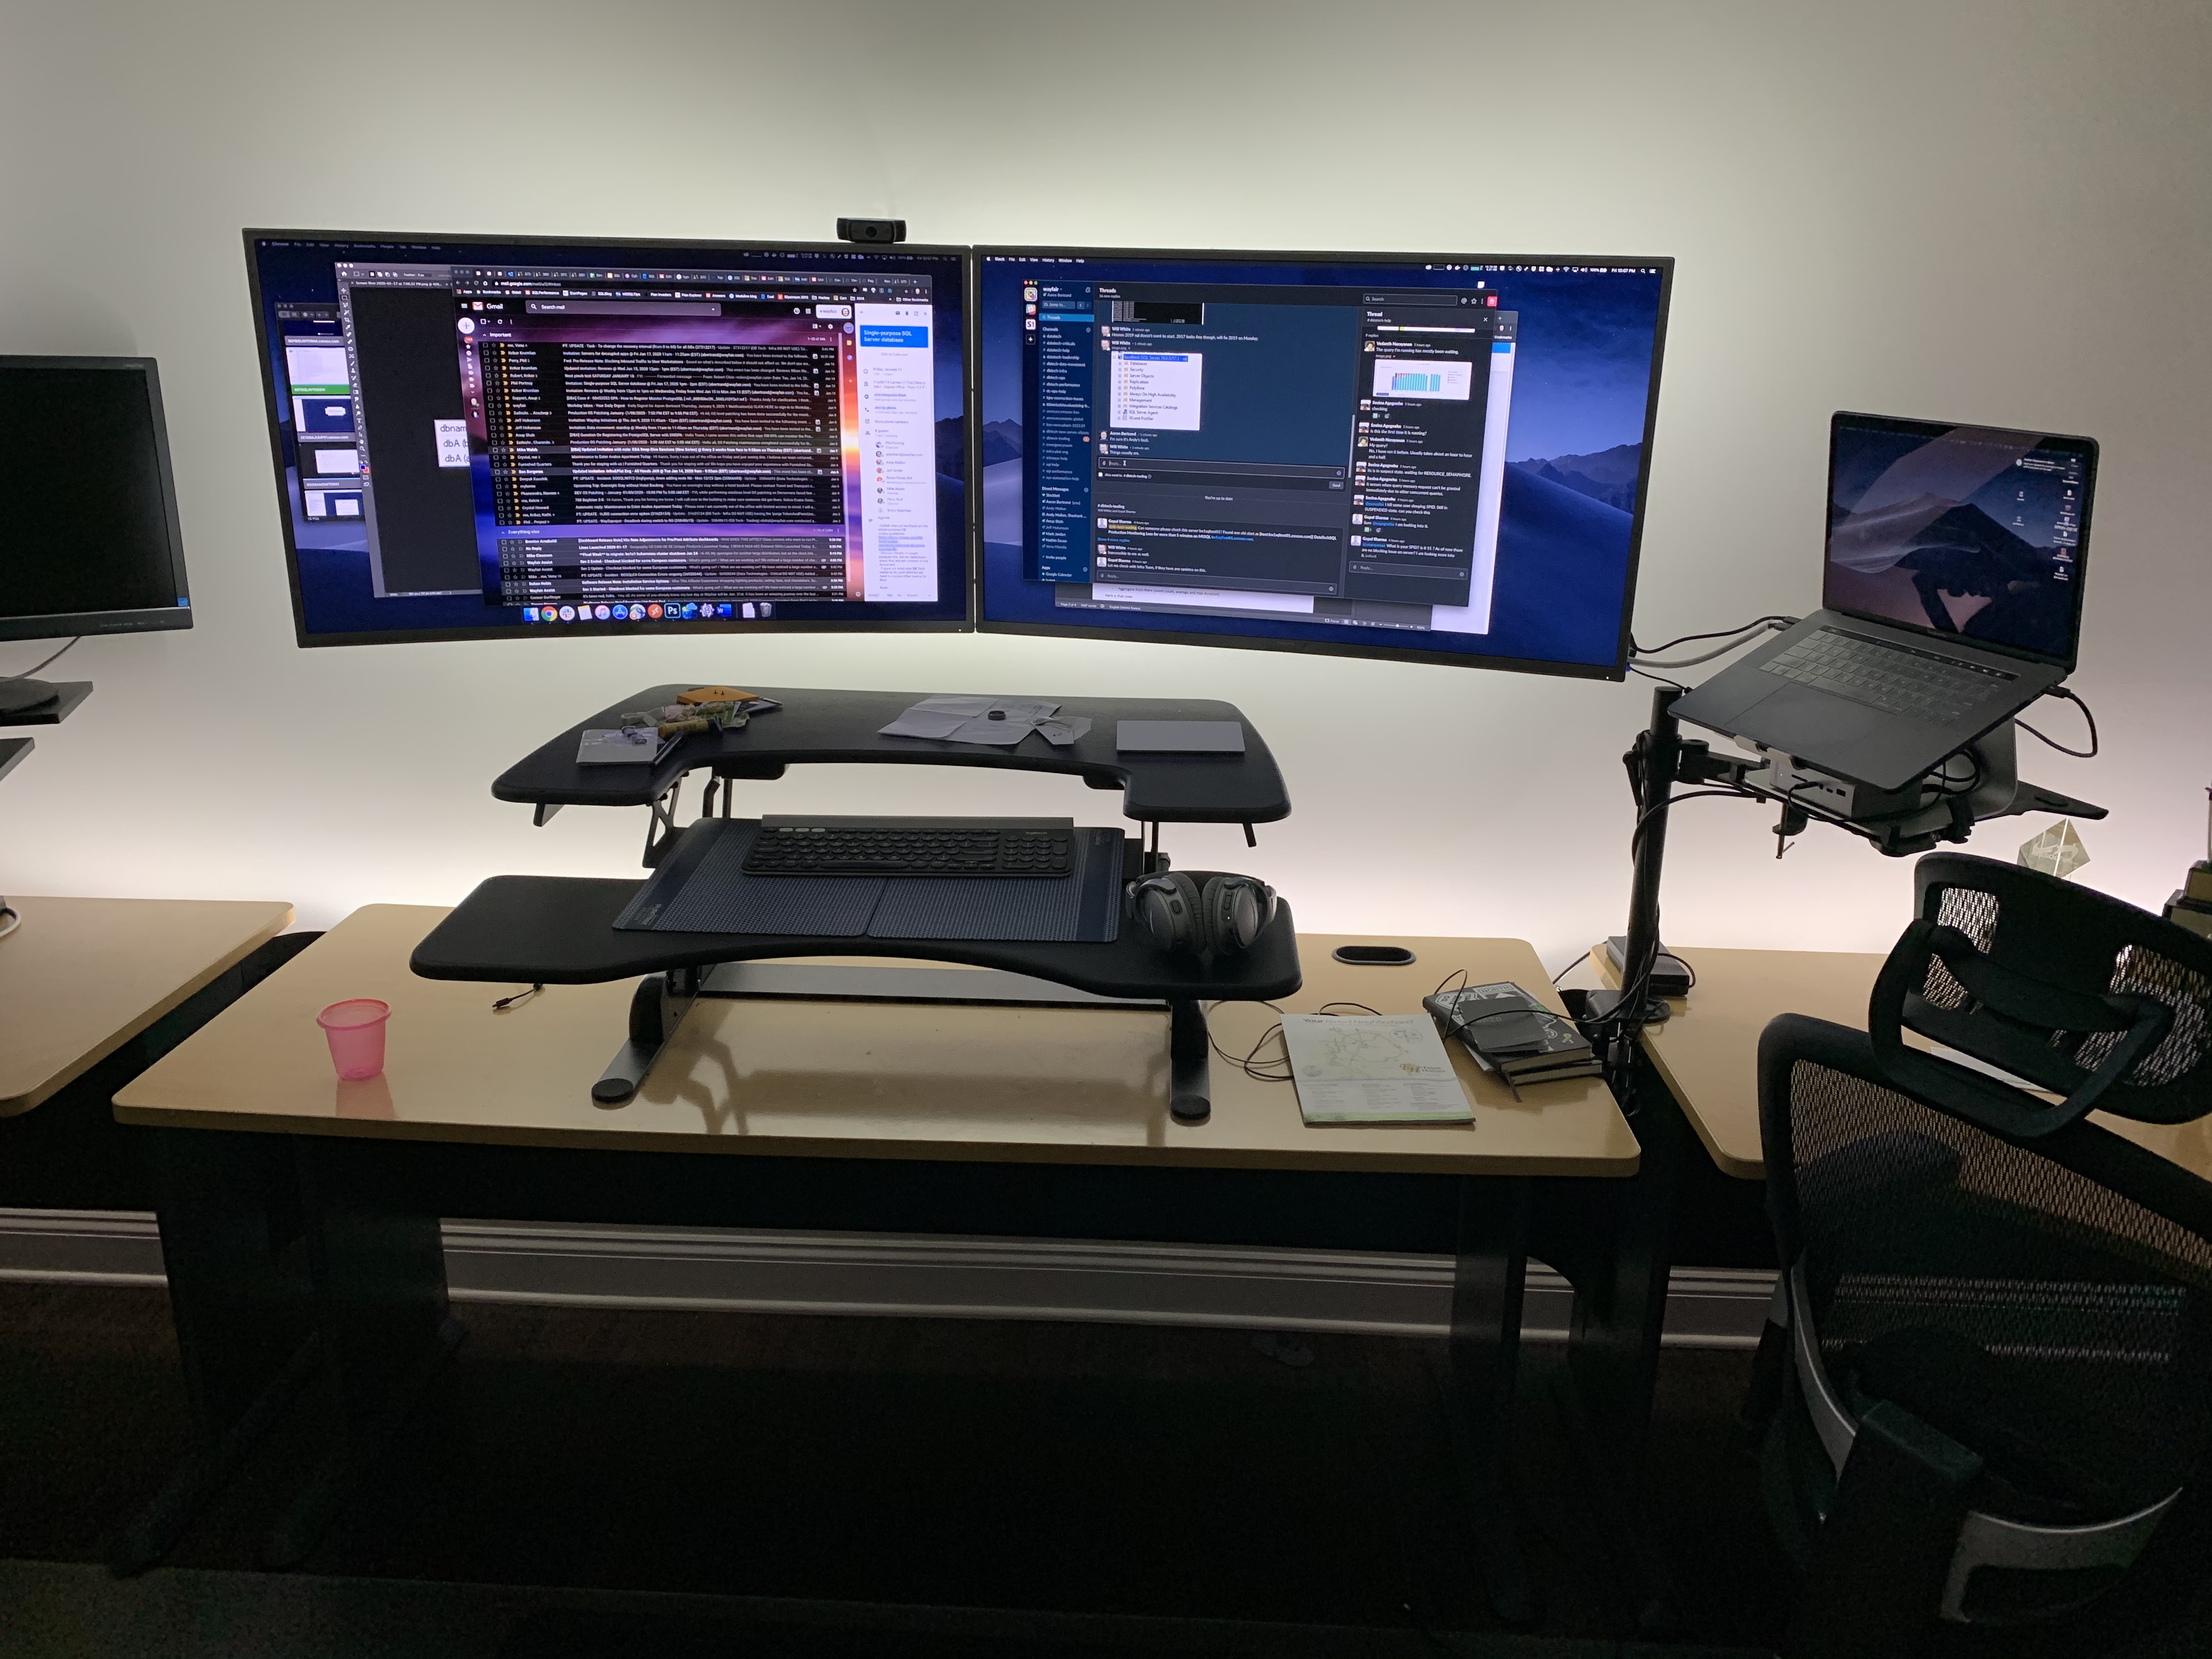
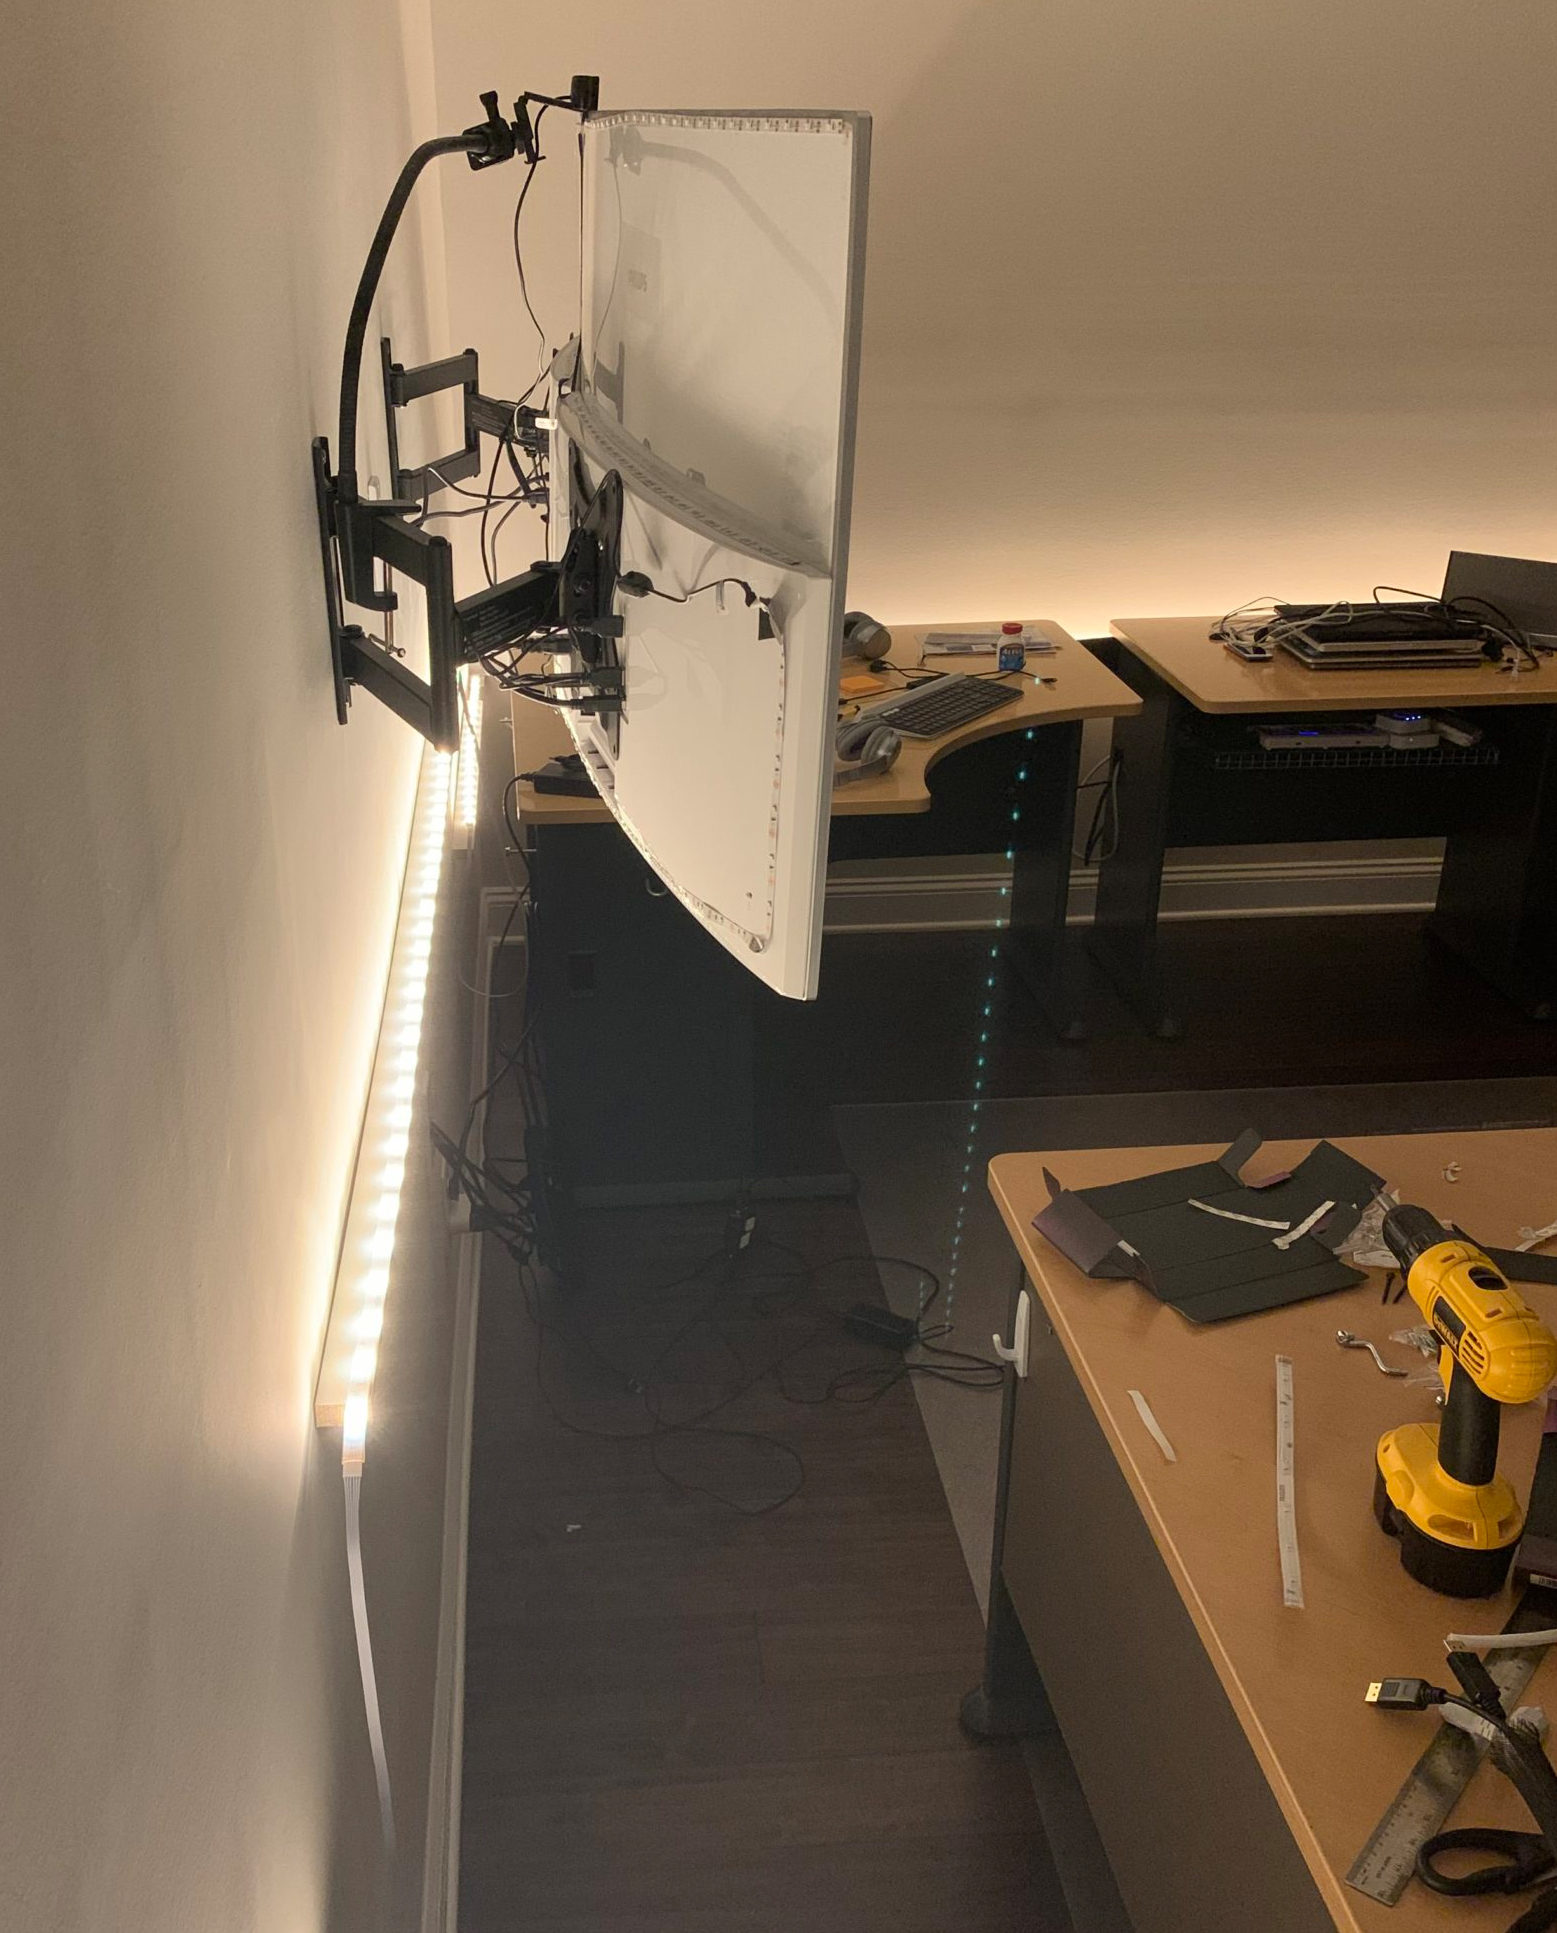
You can see how I make the monitors look so tidy when you can peek behind; there are a few cables to be seen, but most disappear into the pass-through and come out down below. My webcam is a Logitech c930e and is mounted using this very rugged, appropriately stiff swivel clamp. The monitors themselves use these super affordable mounts, but don't be fooled by "full motion" – yes, they are very flexible side to side and in and out, but tilting is a lot more complicated, either before or after the monitors are on there. The mechanism involves four opposing nuts and is only spec'd to tilt +/- 15°. I didn't even try; I suggest just mounting them perpendicular to the wall and at the right height (vertical center at your eye level if you can, or if multiple people will use them, a good guide is what you do for pictures – vertical center at 60").
When mounting monitors, please measure twice and cut once – it can take some finesse to get two monitors mounted this way, and you'll either have to sacrifice location (I'm about an inch off of horizontal center), or distance from the wall, in order to get both mounts up on studs and no space between monitors. I use a little strip of black duct tape (electric tape will work too) to cover the gap – this eliminates light peeking through and can protect positioning from subtle nudges.
And please, just go into studs, above all else, and don't do it alone. I don't ever want to hear a horror story about you putting too much trust in drywall anchors or your ability to hold a monitor with one hand and a screwdriver or drill in the other. I can literally hang off these things and don't have any concern about the wall holding these screens up. In any case, I'm quite happy with the result, even if I spent more time with a level than I should have.
On the floor you can see the 118" x 60" Floortex floor mat. Do not buy this for carpets; it'll be like a Slip N Slide. Also, sounds like common sense, but do not buy a floor protector made for carpets and put it down on your hardwood. Your floors will look like a naked CD you found under your car seat. For all you kids who don't know what a CD is, they're like DVDs, but… oh, you can Google it.
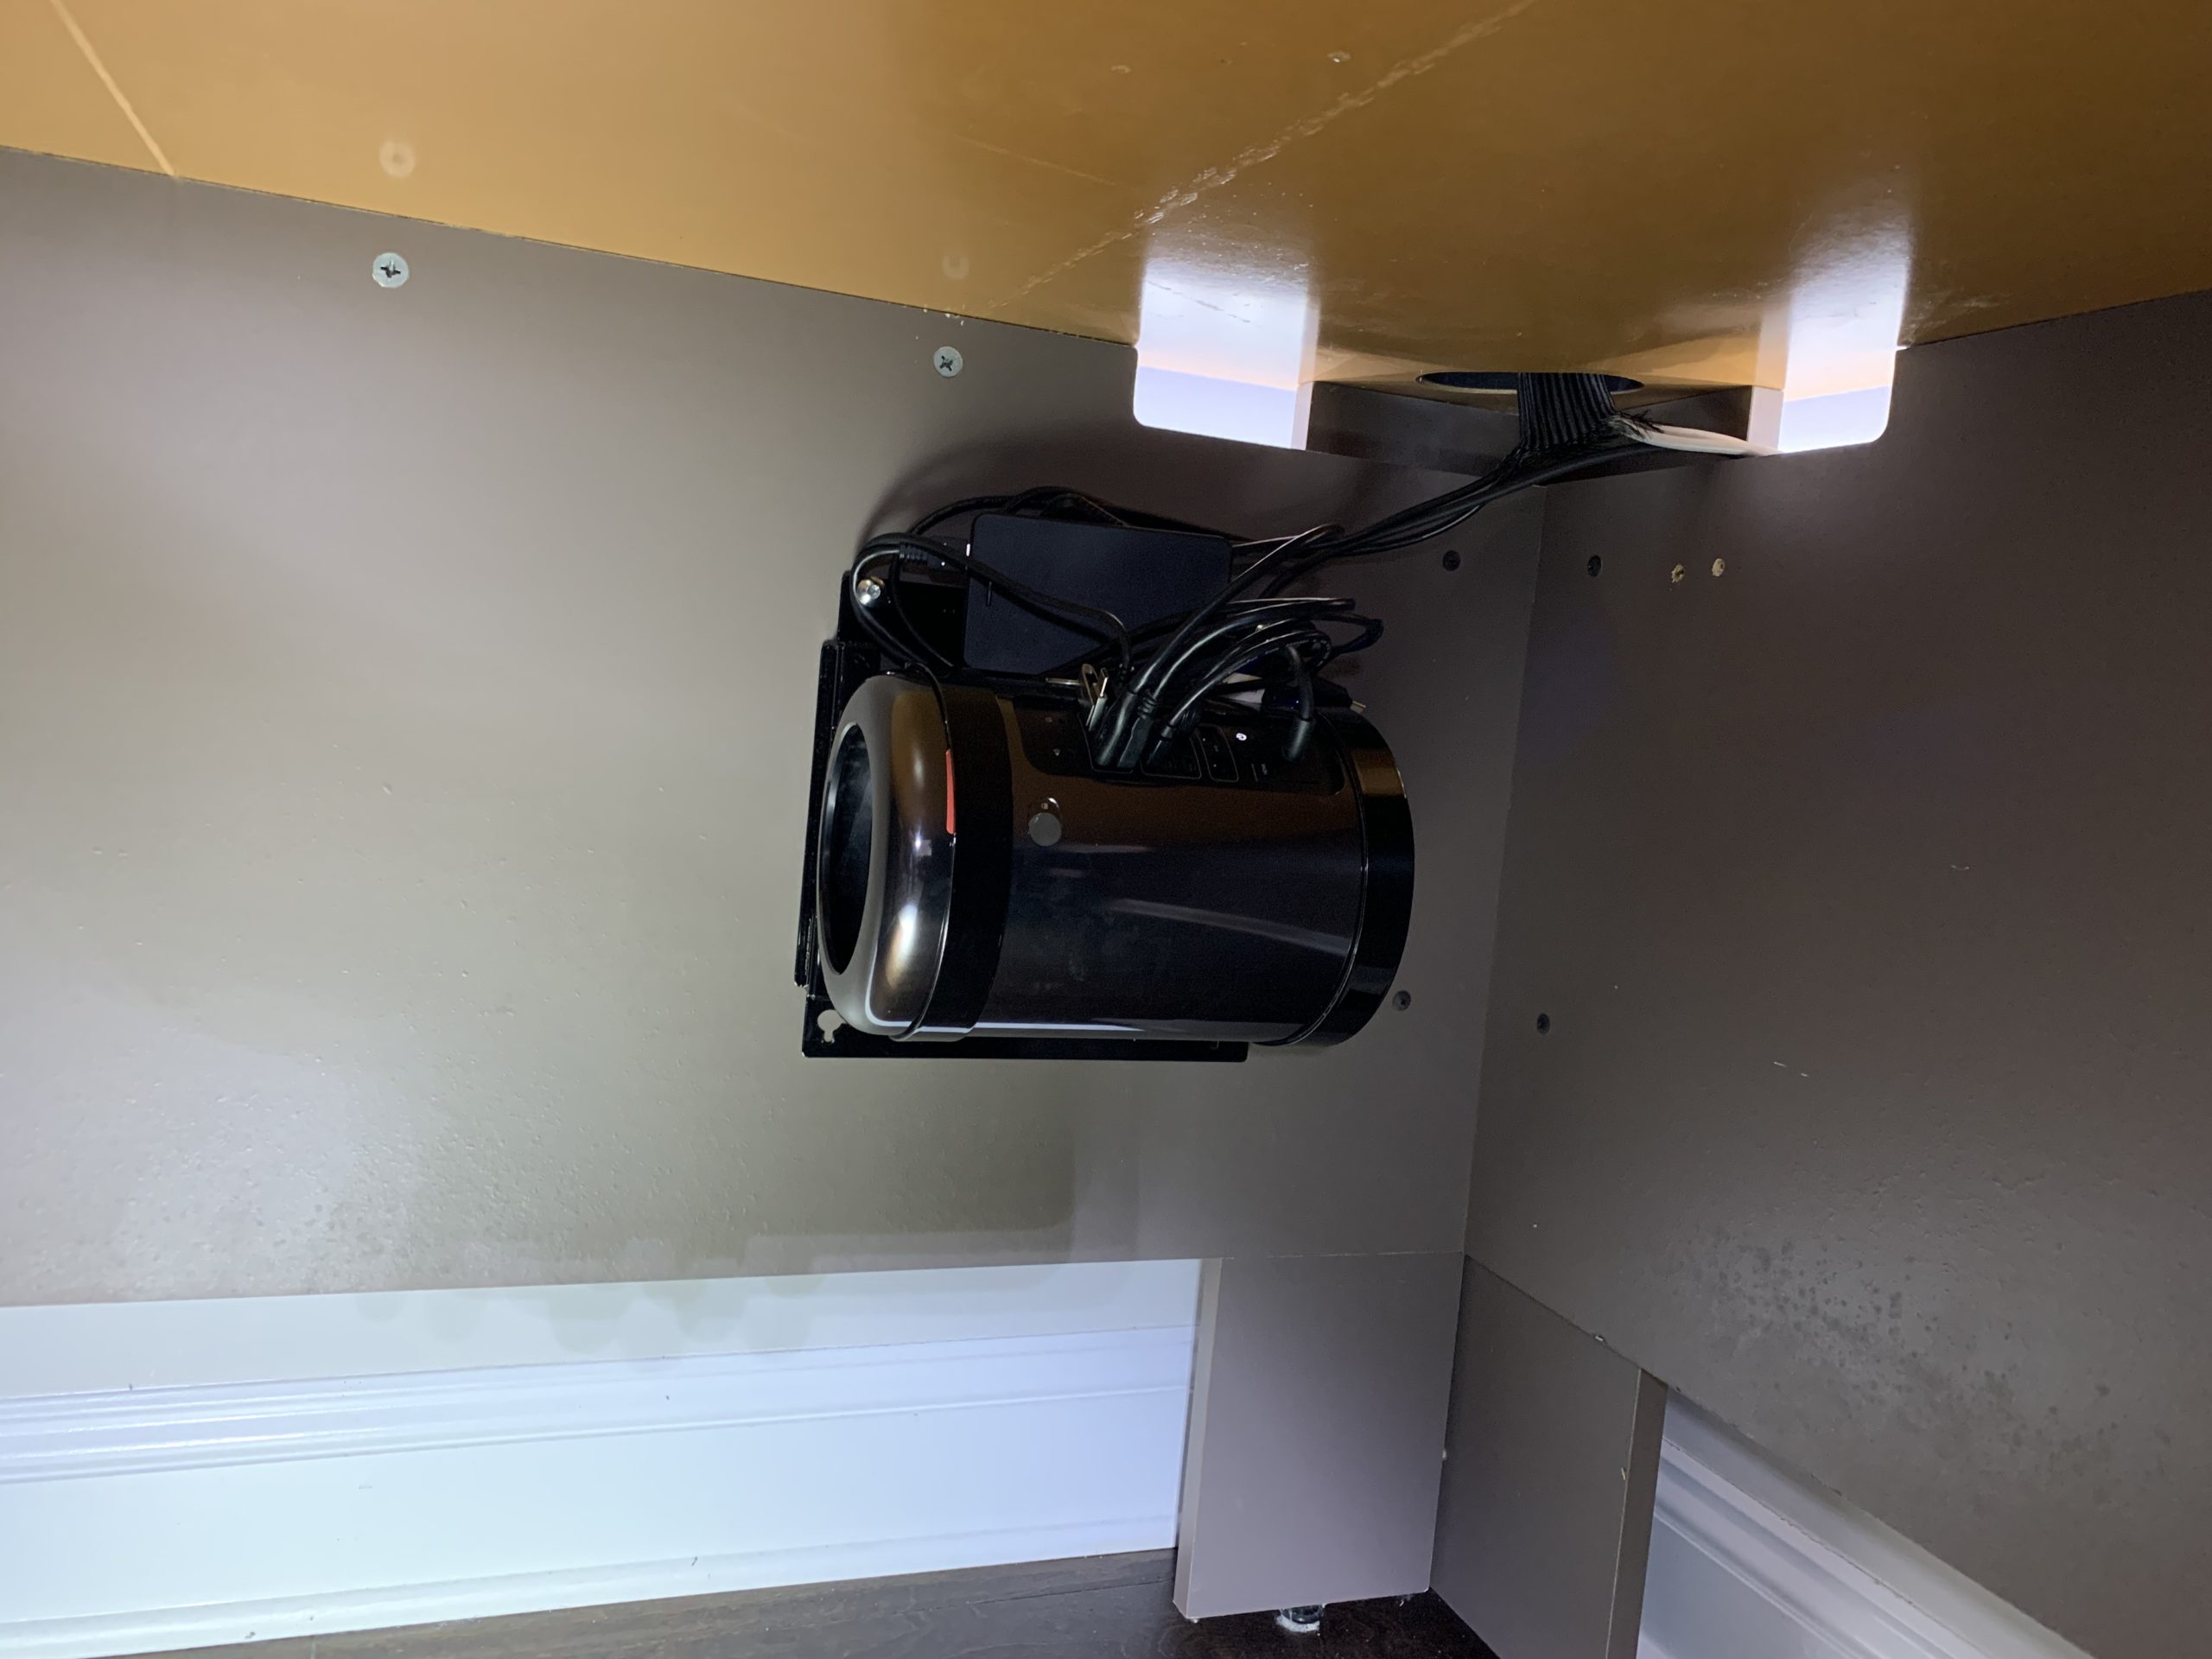

Next I mounted my Mac Pro (yes, still this Mac Pro) under the left corner desk, since it would no longer be connected to the main monitors (my new work laptop has bumped it). I used the Rocstor Rocmount; a bit pricey to hide a trash can, but you can mount this thing anywhere, and it's completely effortless. I'm quite proud of my wire management, though I still have a 40' ethernet cable to run from the central control closet™ – while I love the Mac Pro, its Bluetooth and Wi-Fi antennae are totally lame. It gets 100Mbs in this location, where the laptops get 350+. With a hardline, even over that distance, it's closer to 800. Anyway, my point is, don't be afraid to run ethernet cables; you'll be much happier for (even part-time) fixed-position devices.
My keyboard of choice is a Logitech K780. Previously, I had the K760 solar version, but the key motion became a little flimsy for me after moderate use. I thought I would get frustrated going back to batteries, but I think I've changed the batteries out maybe three times in each keyboard since January 2018. I haven't used a mouse in over a decade now; I solely use a Magic Trackpad 2 so that, when I travel, I have all the same gestures and muscle memory. I always hated mice and, while I realize they are better today, I've gotten pretty used to all trackpad, all the time. The trackpad does require more frequent charging than the keyboard, so I run a lightning cable down through the grommet to the USB hub behind the desk. Please spend the extra money on MFi certified lightning cables.
I moved my bookshelf out from the corner, hooked my retro fan light to a z-wave smart outlet (so, like the other lights, it can be controlled through my SmartThings hub), and fished about 18 lightning / micro USB charging cables through the grommets on most of the desks. These aren't connected to computers, they just use Anker chargers and in most spots share these power strips with other devices. I also set up the three most recent generations of MacBook chargers because, yes, we still have at least one of each. I spread these throughout the room because it's amazing how many devices a family of four will suddenly need to charge, all at once, right before a road trip.
I still use this older Bose speaker because it takes auxiliary input, which means I can connect any iPod / iPhone with this dongle and any old 3.5mm male-to-male audio cable. What a great use for this old 160GB clunker which, amazingly, still works and which, even more amazingly, they still sell (though a newer generation for sure). That device has been transferred I have some old Tragically Hip bootlegs and live recordings (some of concerts I've been to!) that still sound great and that I can't easily move on to more modern devices (never mind find on iTunes or Amazon).


Then I moved to the other side of the room. In this corner, I needed a way to put my laptop close to the wall monitors so it could drive them without me having to shift between monitor screen and real screen. I had this Mount-It! heavy duty monitor arm from a lifetime ago in the garage, and I thought, that vesa mount could probably hold a laptop if positioned correctly. Well, I got this Vivo stand to help, though I had to mount it kind of awkwardly to support the Rain Design mStand. This is a sturdy stand that and allows me to hide cables and the CalDigit, a docking station that reduces the number of cables that have to go into the laptop (including ethernet). I still have some wires to tidy up here, but here's the final configuration of the mount itself, including a basic, upward-facing desk lamp with a Philips flood light that will match the lightstrip brightness and intensity (just not color).

That looks like a mess, but that's the sausage maker's view. From working and room entry vantage points, and especially once everything's tidy, it will look a whole lot better than that.
Now, I'm ready to slide the new desk in, right? Not so fast! Uplift delivered my standing desk yesterday, but they sent me the wrong frame, which I now have to RMA. So I'll have to continue this in the "3 to 4 business days" it will take to correct their fumble. The desktop surface is here at least, lying there, useless:
It matches the floor (and the doors that don't exist yet), but not the Bush furniture. That's a longer-term project, for sure. In the meantime, stay tuned for the desk and the tidying of the remaining wires (I left them messy for Rob Farley).